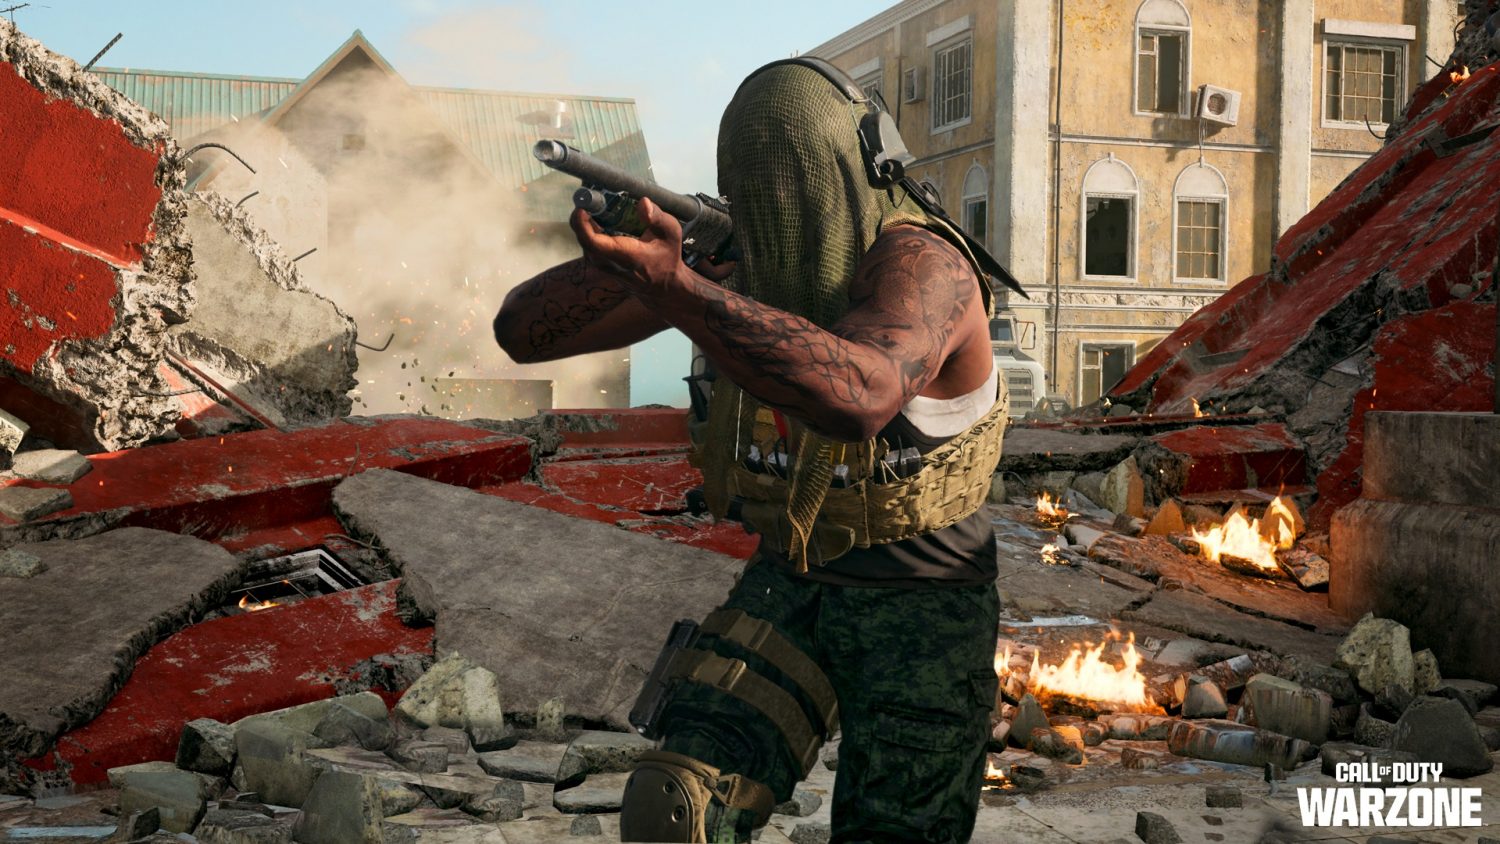
Rebirth Island pronta e rinnovata per Warzone: ecco tutti i dettagli nell’anteprima ufficiale
Speciale Rebirth Island – Pochi minuti fa è stato pubblicata l’anteprima dell’imponente aggiornamento che colpirà presto Warzone e MW3, ovvero l’attesissima Stagione 3 in arrivo all’inizio della prossima settimana.
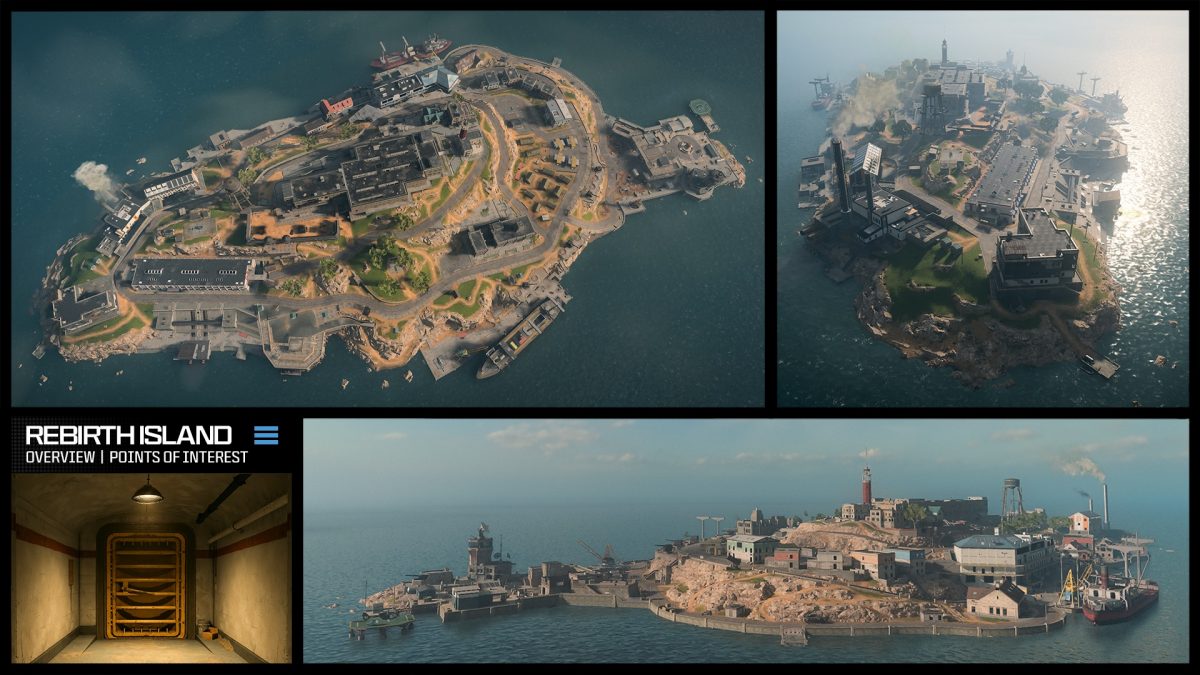
Come noto questo update introdurrà nuovamente in gioco la meravigliosa Rebirth Island, che per l’occasione ha subito un deciso restyling. Pur mantenendo assolutamente inalterate le sue forme e le sue strutture, la maggior parte dei POI di Rebirth ha subito una bella svecchiata, con l’aggiunta di svariati modelli assolutamente originali.
Vi è poi l’apertura di un tunnel sotto a DOCK, zona che diventerà assolutamente centrale ora che la meccanica del nuoto è finalmente disponibile sulla mappa.
Ecco di seguito l’anteprima ufficiale di ogni singola zona della nuova mappa. Insieme alle descrizioni ufficiali anche le immagini, nelle quali è possibile vedere quali sono state le maggiori modifiche di restyling.
Anteprima ufficiale di tutti i POI di Rebirth Island – Warzone Season 3
Bioweapons
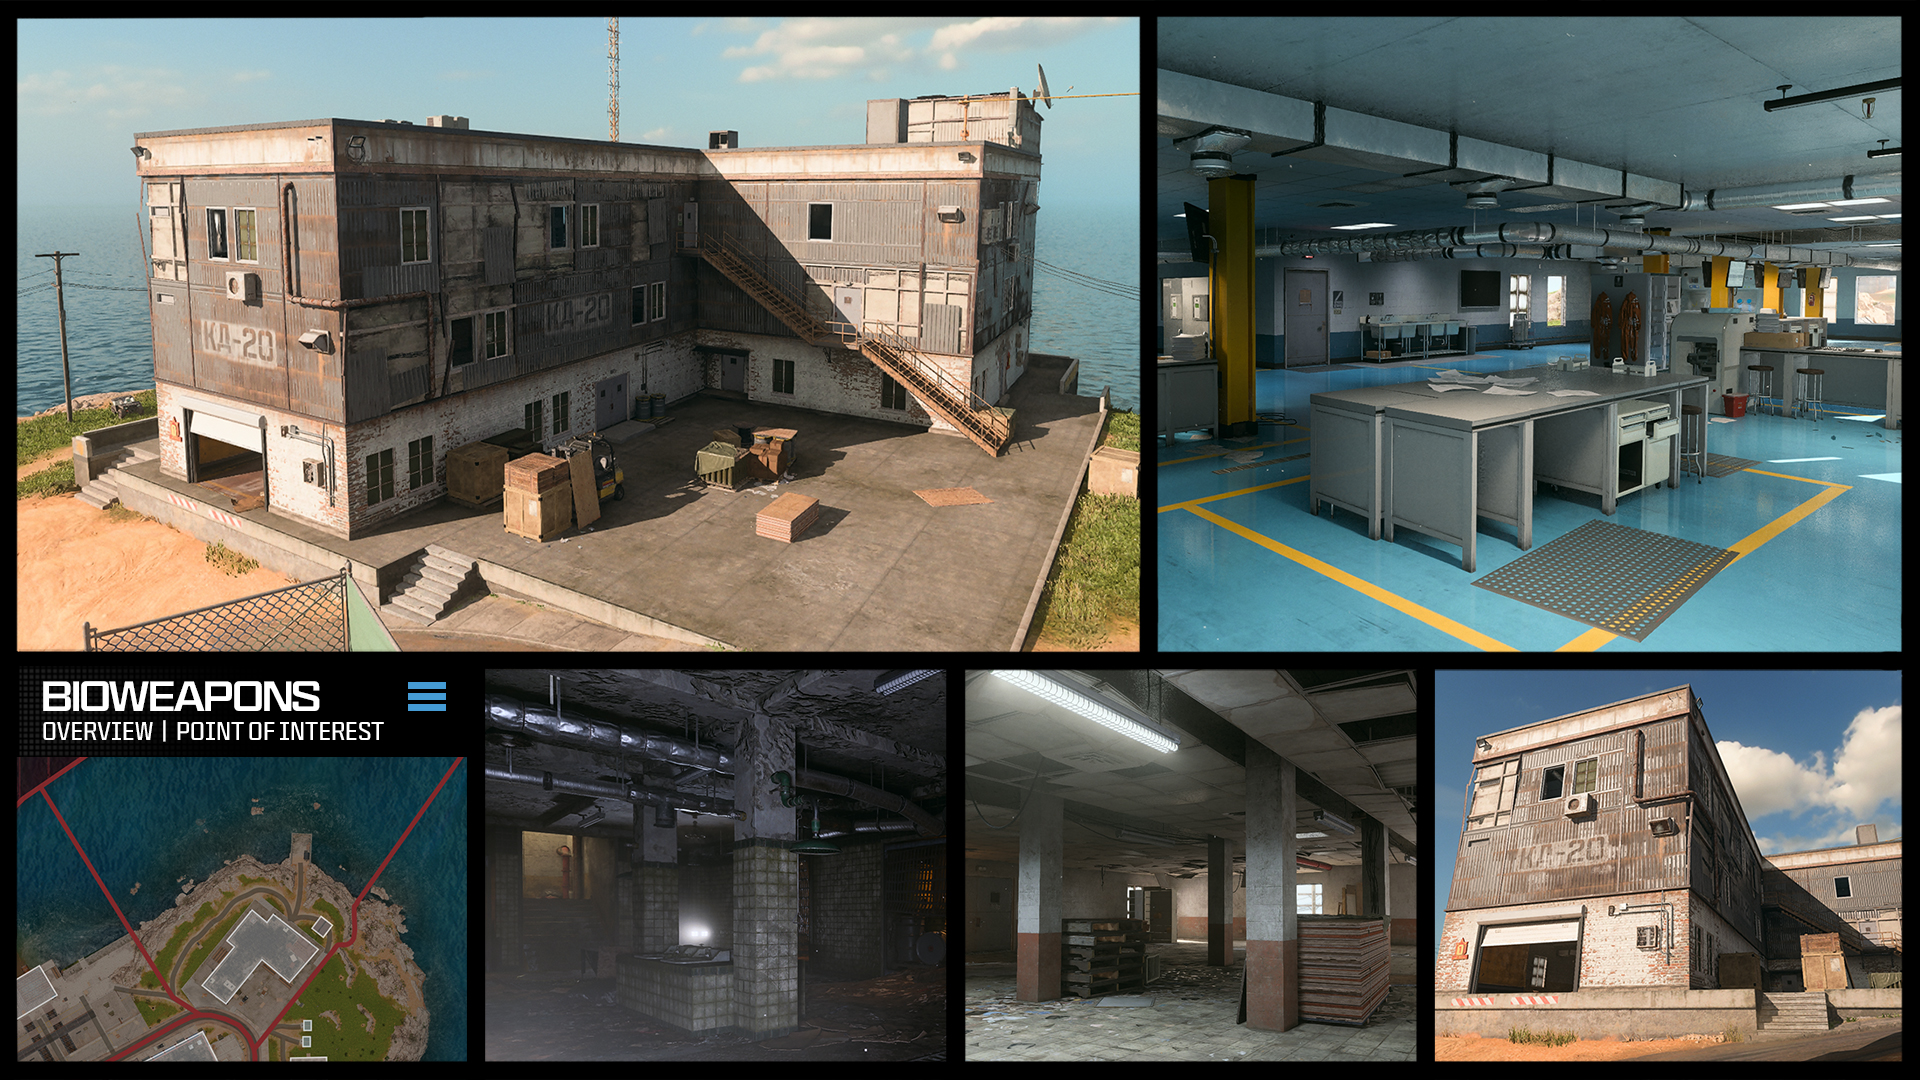
One of the bona fide hot drops, this three-floor brick and steel building is easily spotted on its coastal corner along the northern edge of the island. While much of the structure has been left to rust and decay over the decades, the Konni Group has thoroughly modernized the third-floor laboratory with the latest in research technology. The same cannot be said for the atrocious basement showers and the remains of an office floor within the building. A great place to make a stand, the roof is accessible by parachute and by interior and exterior stairs. For a quick escape, take the zipline over to Chemical Engineering.
Industry
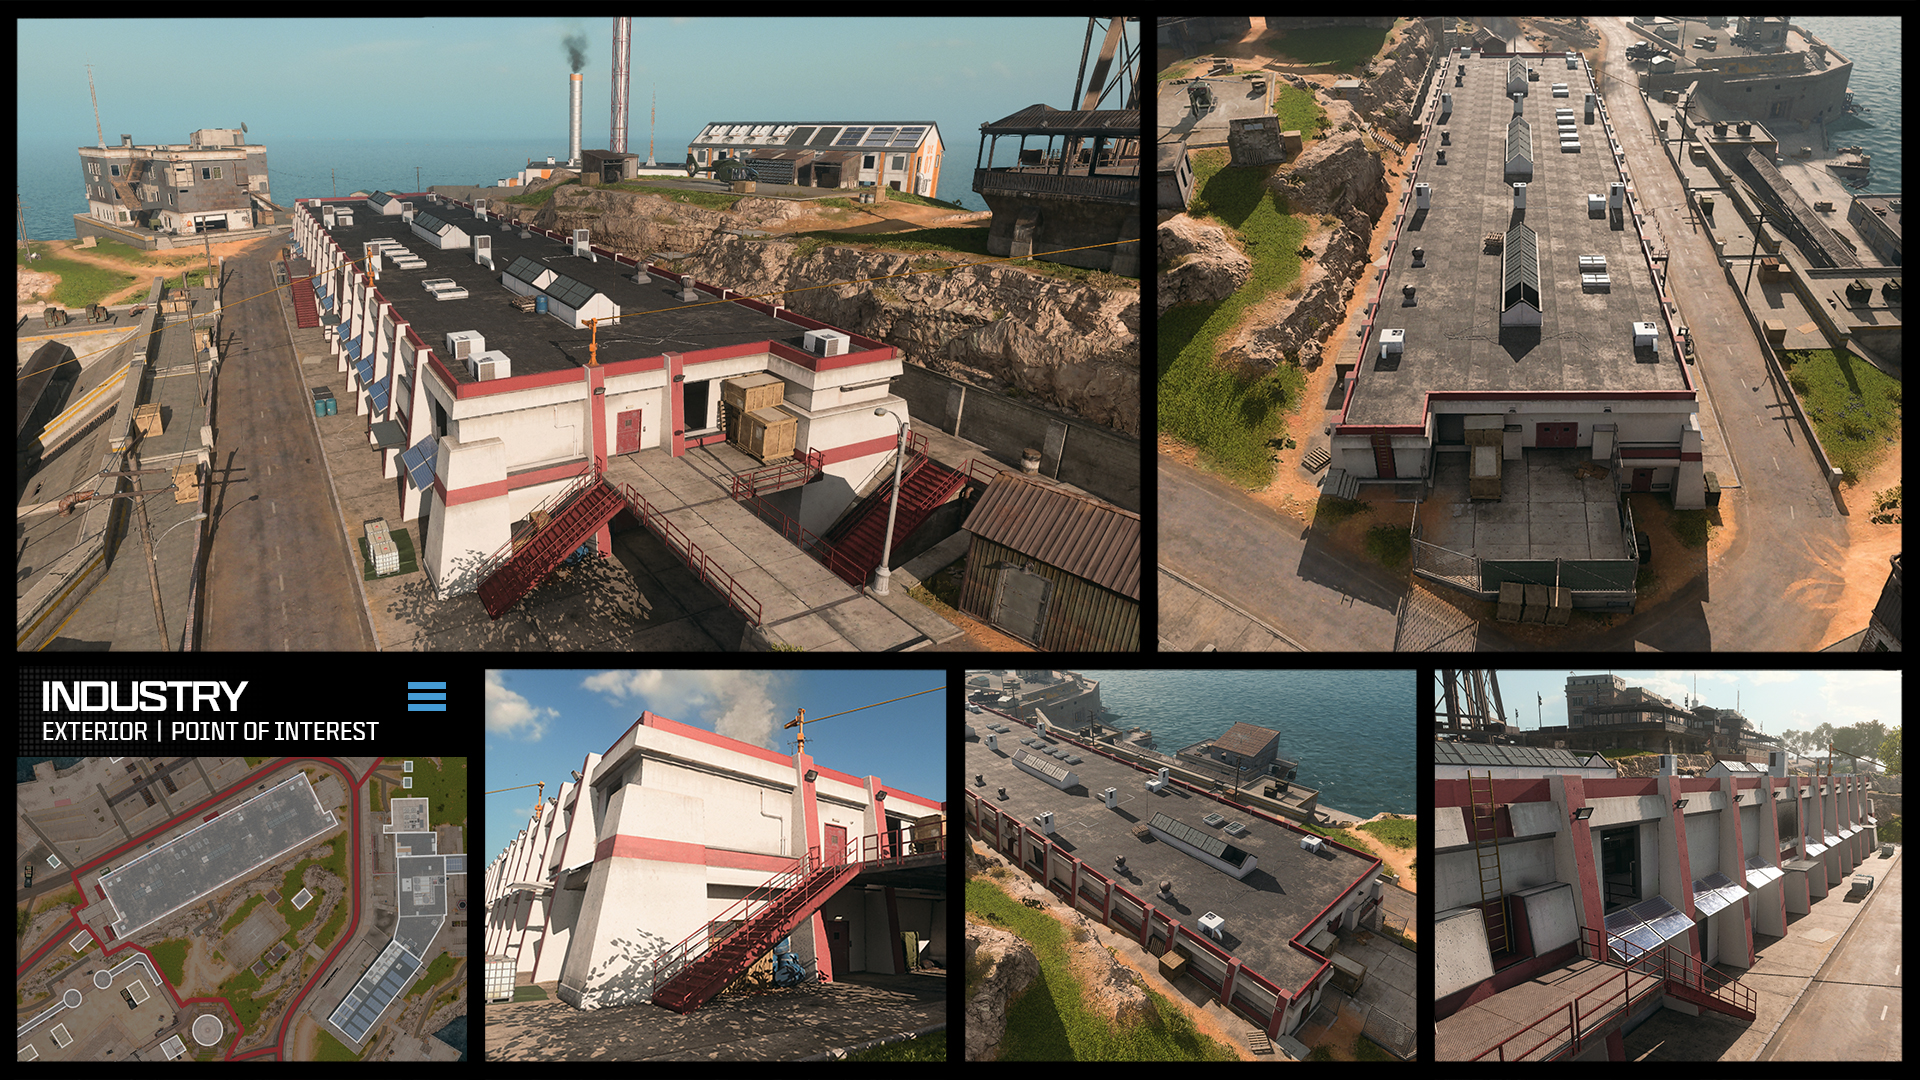
Overview and Exterior: This low-lying structure nestled below the helipad plateau has received more than a new coat of red and white paint. But the flanking alley between the two areas is still a good place to take cover, and there are plenty of doors and breakable windows allowing you access into the main, two-floor interior. Head southeast to the bridge connecting to the road close to the Prison.
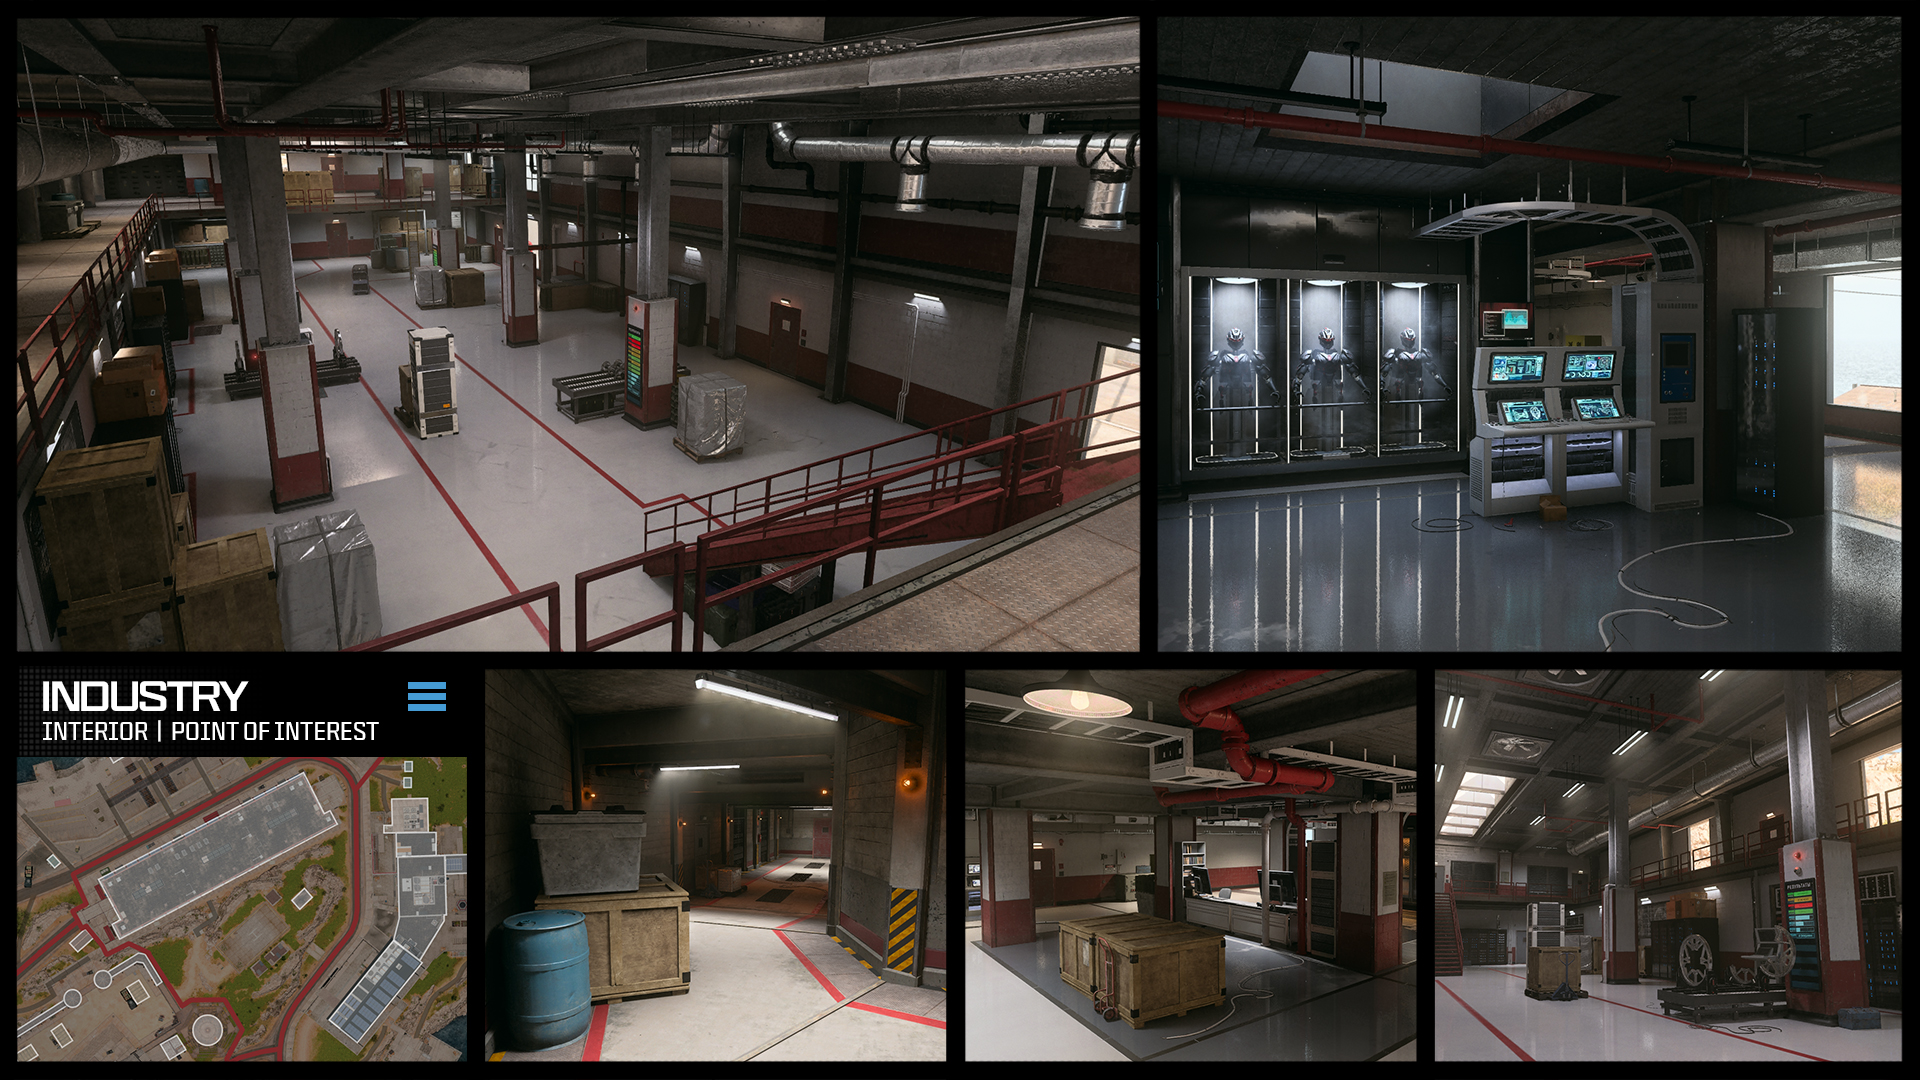
Interior: The interior of this giant storage structure has been cleaned up considerably and features a white polished floor and impressively enhanced visibility when checking the dark corners and crate stacks within. Don’t miss the side room, accessible from both floors, that leads to a tunnel cutting under the helipad to the front of Chemical Engineering.
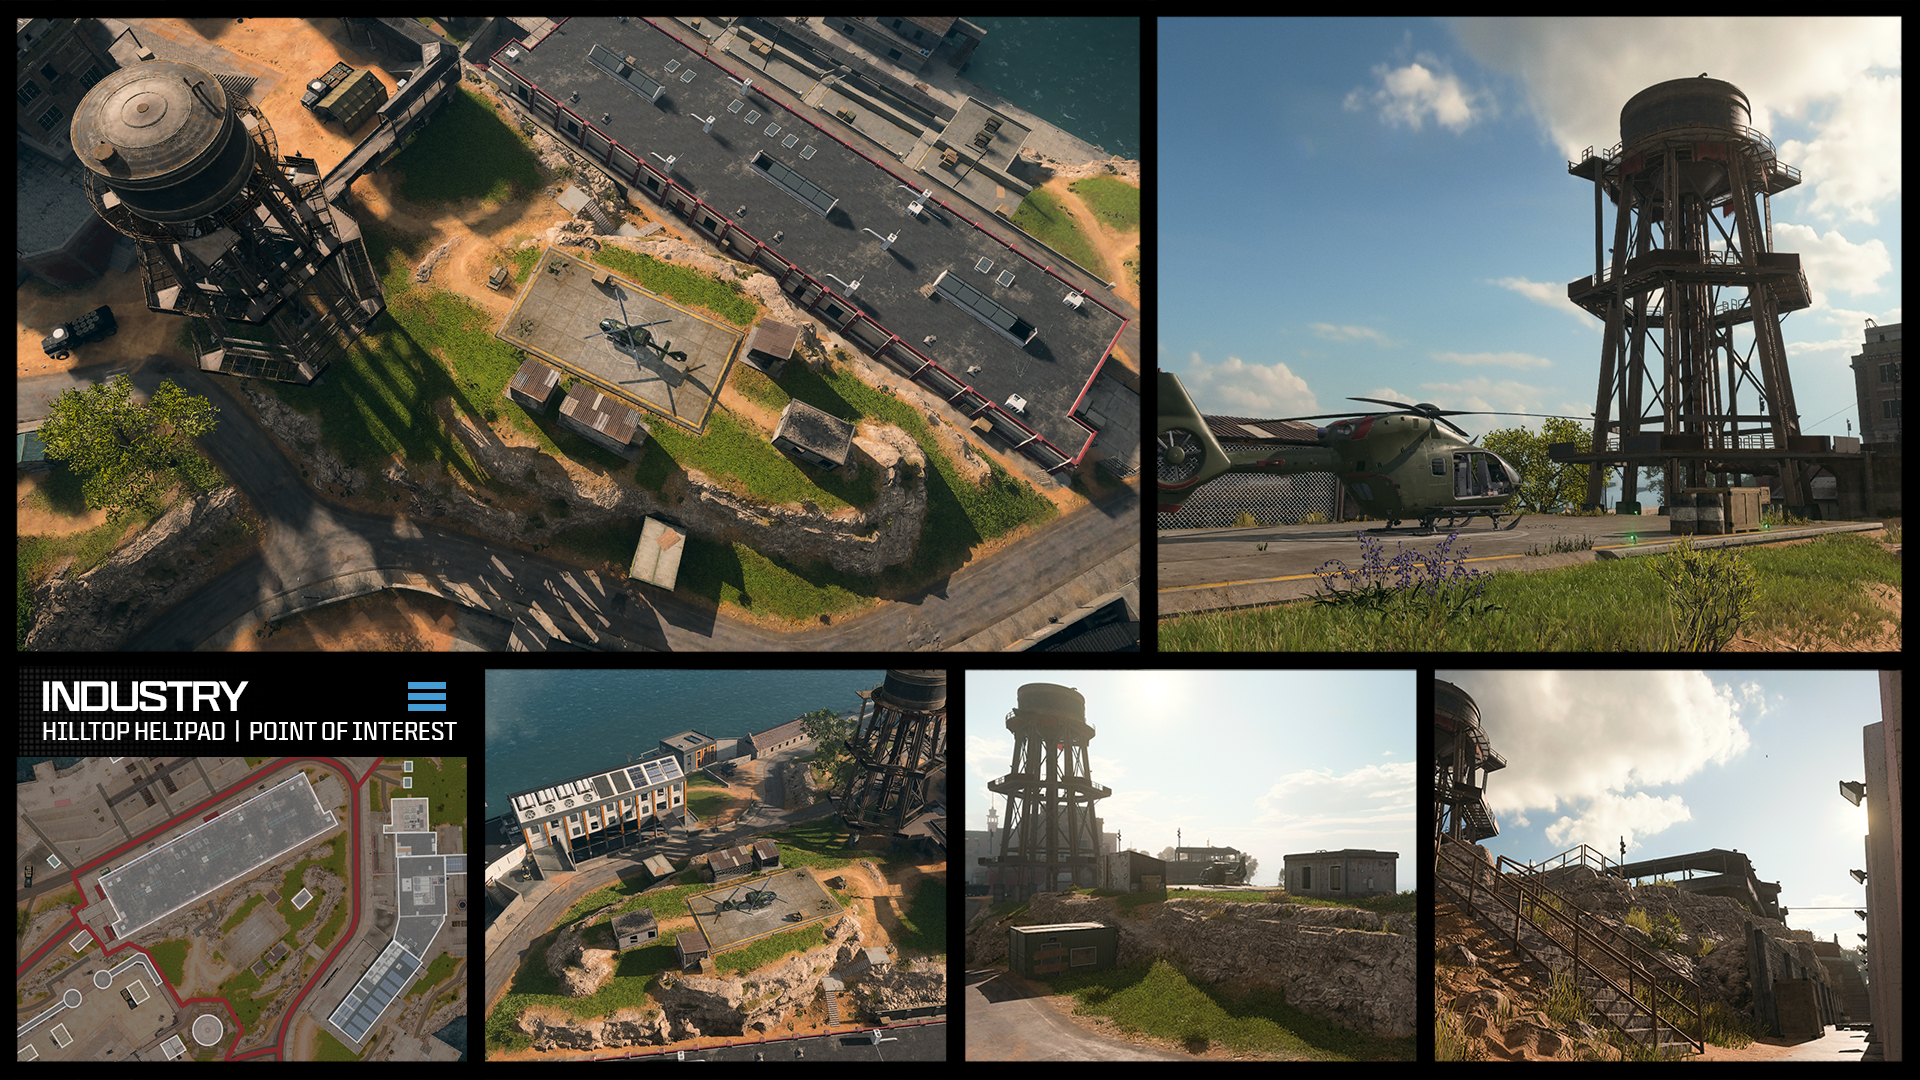
Hilltop and Helipad: Adjacent to the long Industry building is a raised plateau, featuring a helipad and several sheds, one of them accessible with several windows providing views over the Industry rooftop. If you’re not spotted on this exposed grassy knoll, this makes a good pivot point along the road. It is adjacent to the Water Tower, a major Prison landmark.
Chemical Engineering
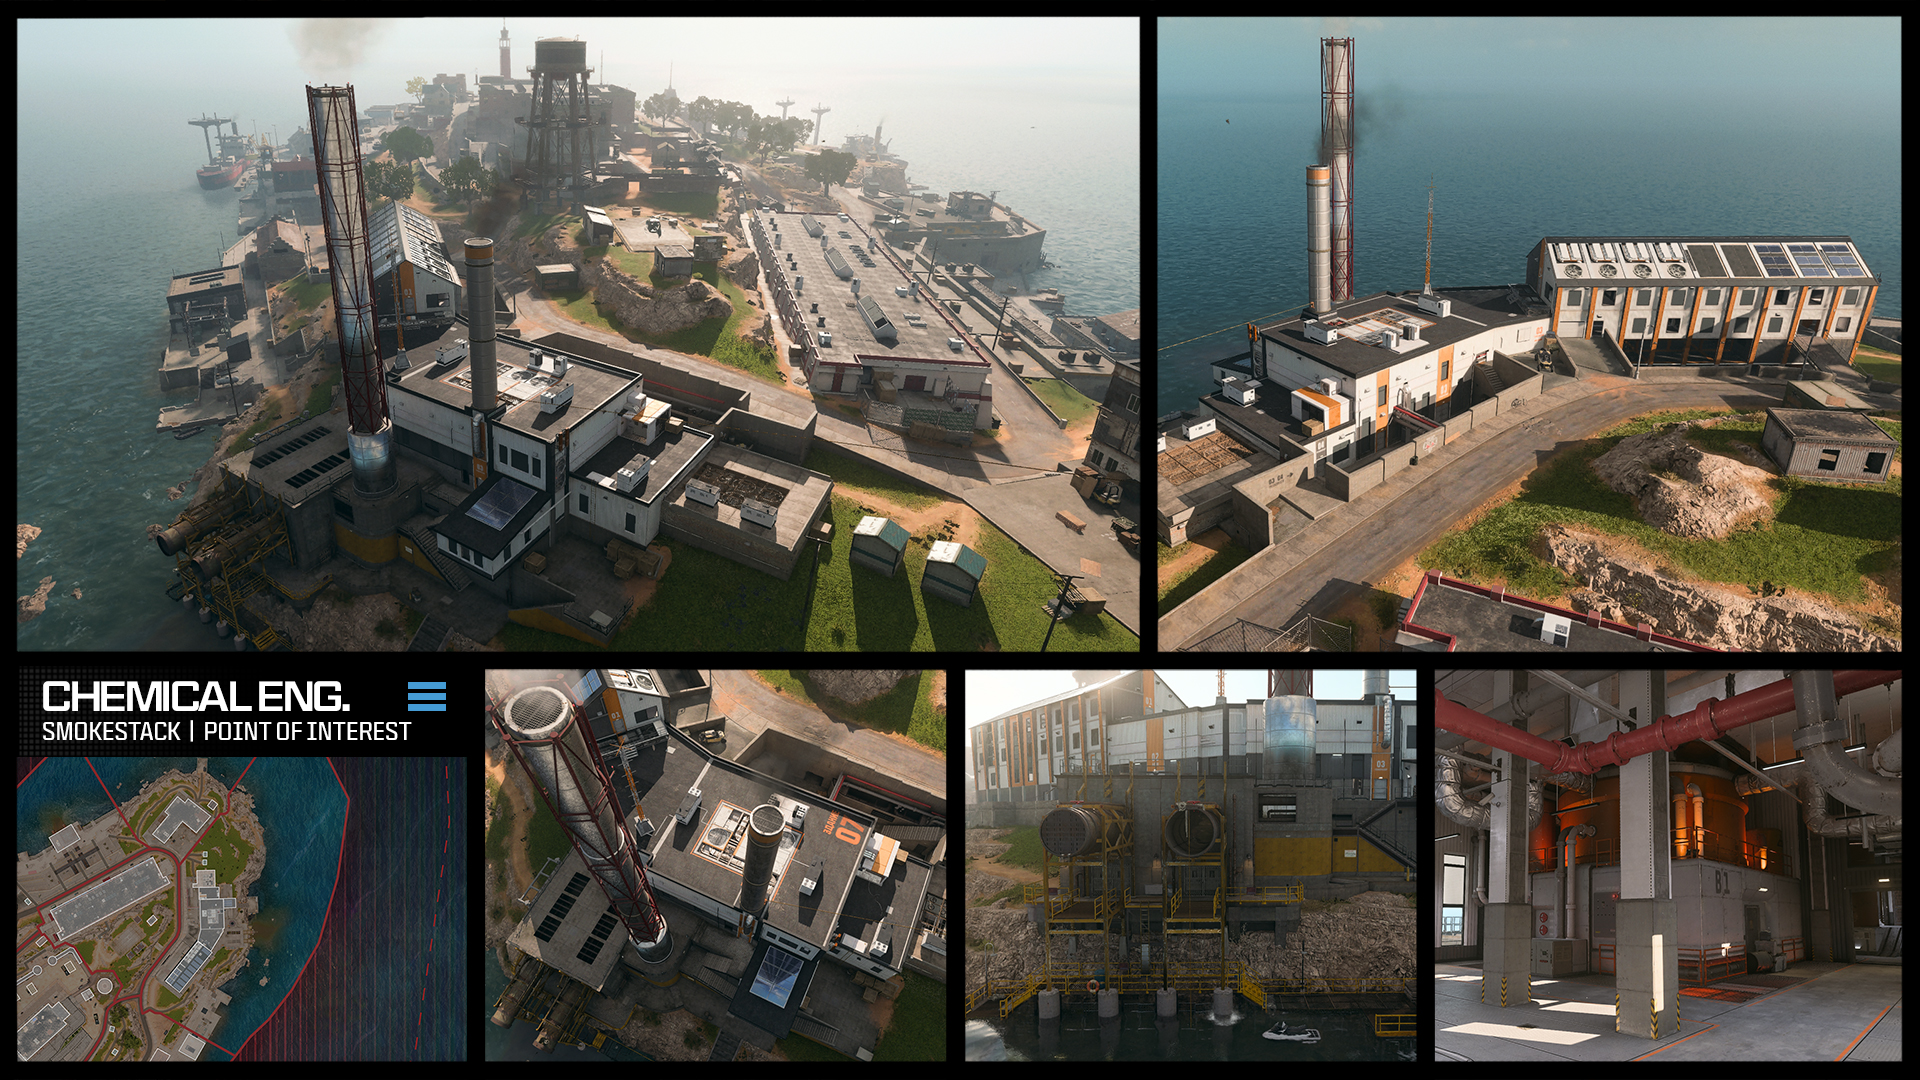
Smokestack and Factory: One of the few POIs to receive a complete retrofit, this area is painted in orange and white and is easily identified by the smokestacks rising from its roof. From the roadside or rocky shoreline, there are numerous entry points, and the low exterior ground level below the road offers a tunnel to Industry as well as protection. Investigate the zipline and ascenders before you enter the main, L-shaped factory floor featuring huge chemical tanks and a row of control systems, as well as smaller rooms and links to the adjacent building.

Building No. 7: Though both structures are numbered “07,” the pitched roof and visible sign of the storage and security building is a major draw for players looking to stock up on supplies and engage in combat across multiple floors. The upper levels are accessible by roadside ramps or a lower unloading area that is fully open to the elements, as well as a wraparound walkway along the shoreline. The upper floors, which include server rooms and security offices, also provide a ladder to the sloped roof, as well as commanding views across Harbor, the hilltop, Industry, and Bioweapons.
Dock
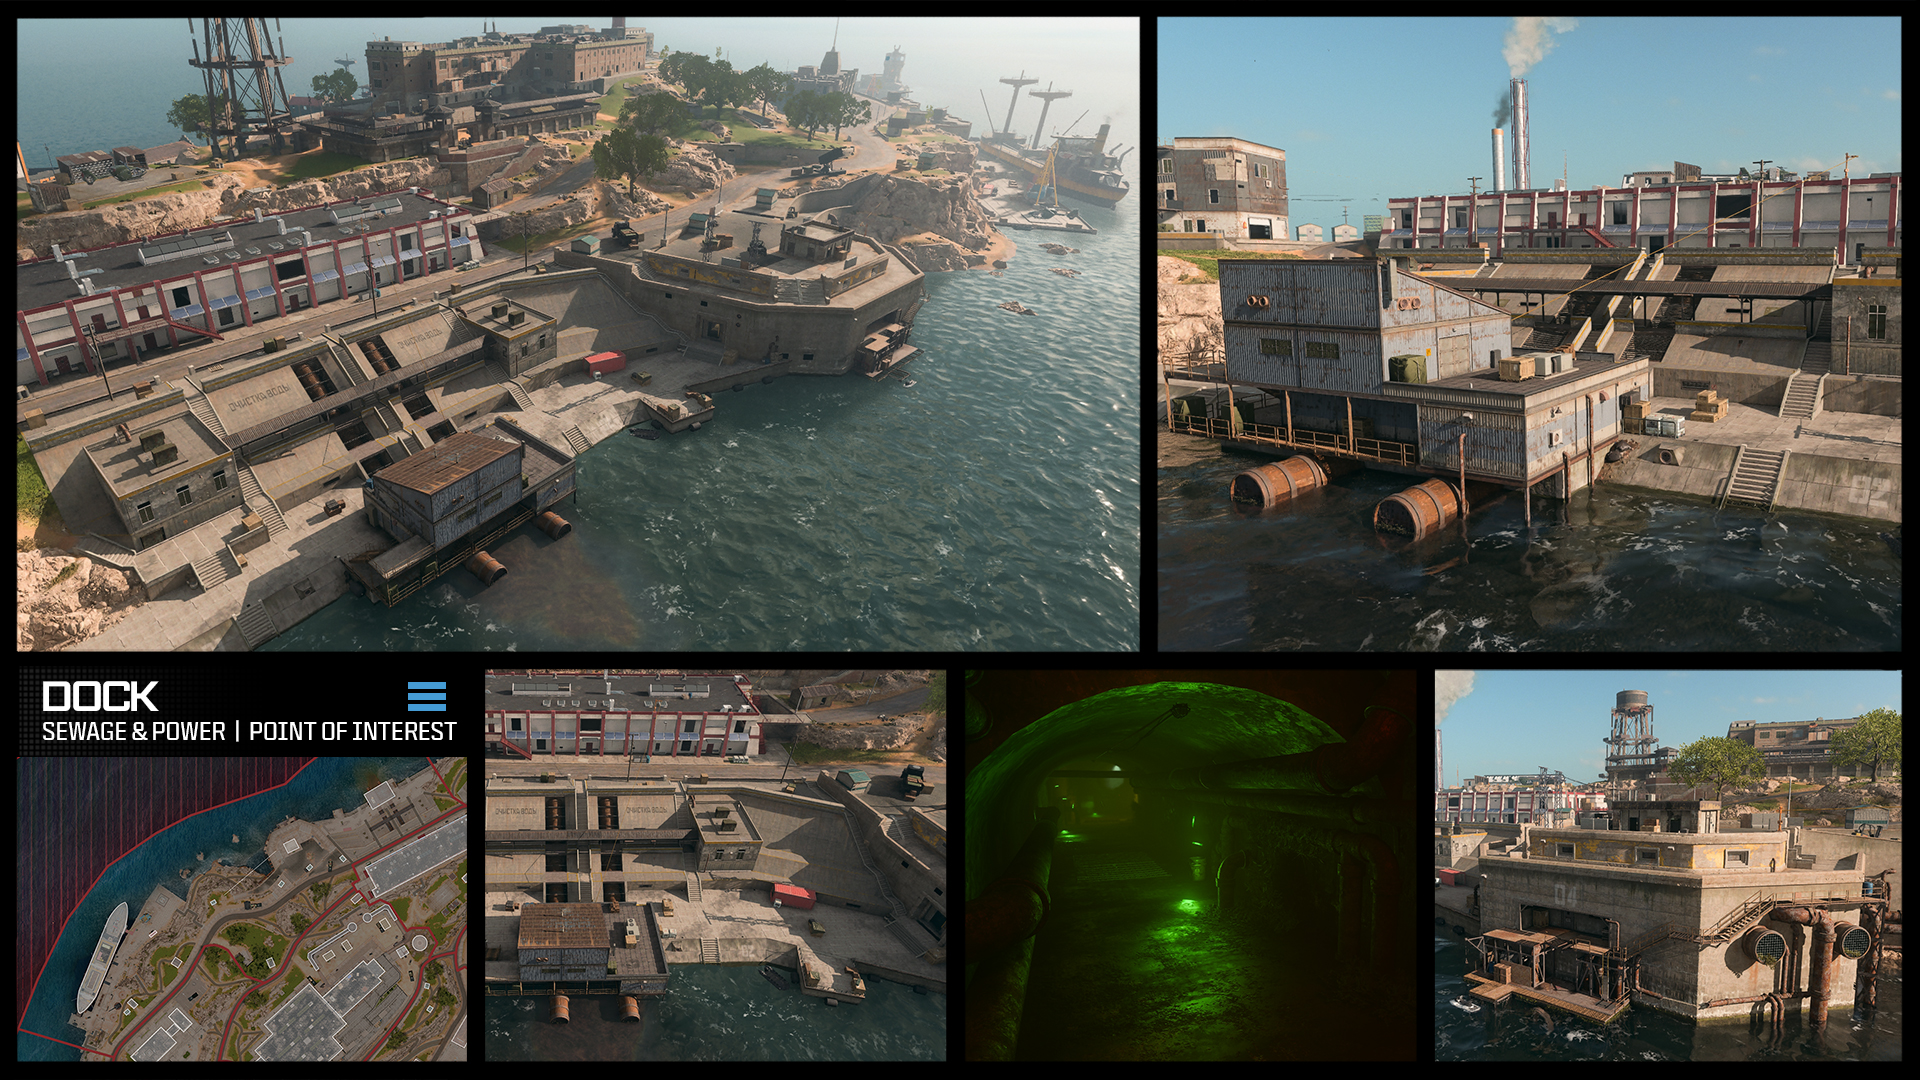
Sewage Treatment, Power Room, and Lookout: This POI stretches all along the northern shoreline of the map, beginning with a sewage treatment plant connected to Industry. Adjacent to that is Power Room 04, jutting out on an elevated concrete structure. Rusting catwalks connect these areas. There’s both an open Bunker door and a submerged pipe leading into a completely waterlogged Bunker, and likely a few secrets lost to the waves.
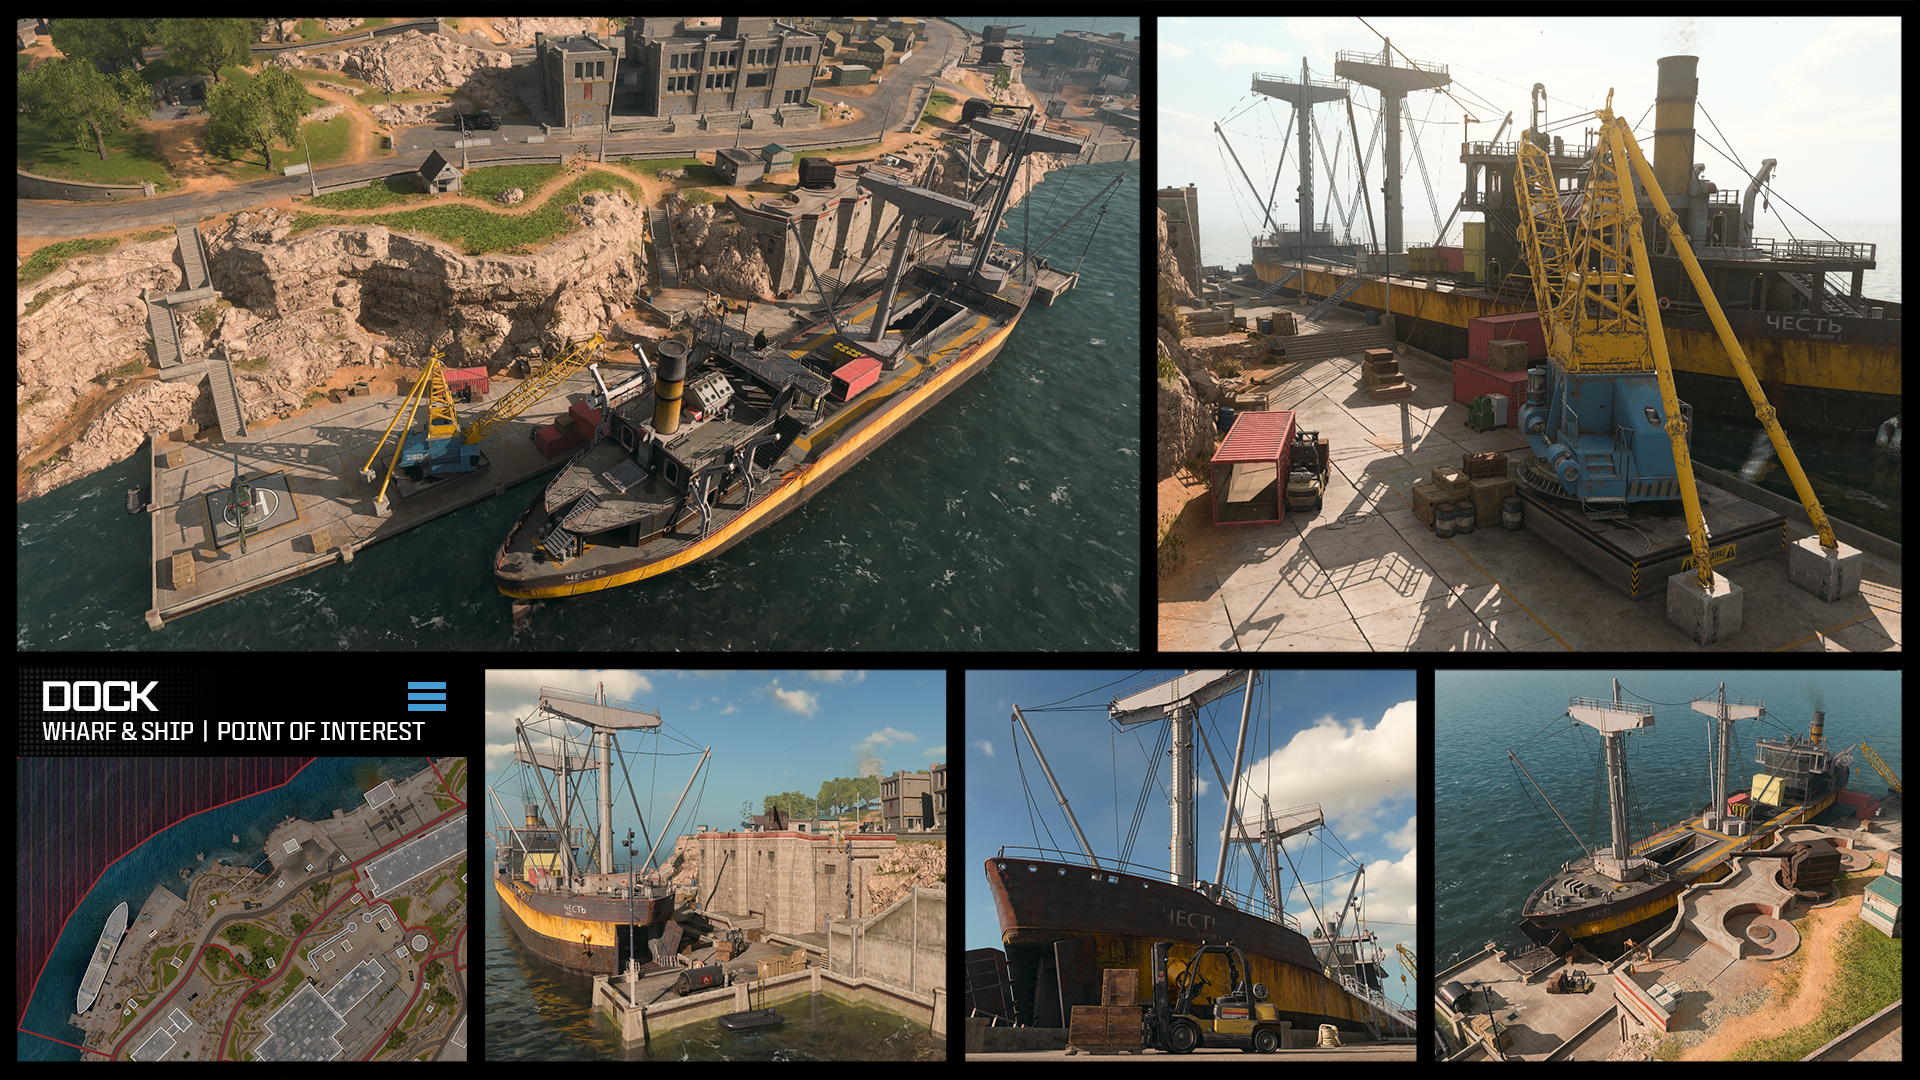
Wharf and Freighter: Farther along the elongated dockside, a large freighter is accessible for exploration. The deck of this ship sits in full view of the nearby gun emplacements, so watch for foes attacking from that direction. Move down the ramp and use the clusters of crates and supplies on the dockside as cover, or hide inside the ship. Climb the foremast if you’re after a sniping position.
Control Center

Once a construction site, this piece of brutalist architecture features a main building connected to a smaller section via a covered breezeway and a concrete exterior forecourt behind the structure. You’ve excellent vantage points to Prison and out toward Living Quarters. Inside, even the larger of the two buildings has tight interior spacing, with several offices on two floors to explore, ideally in Tac-Stance.
Prison
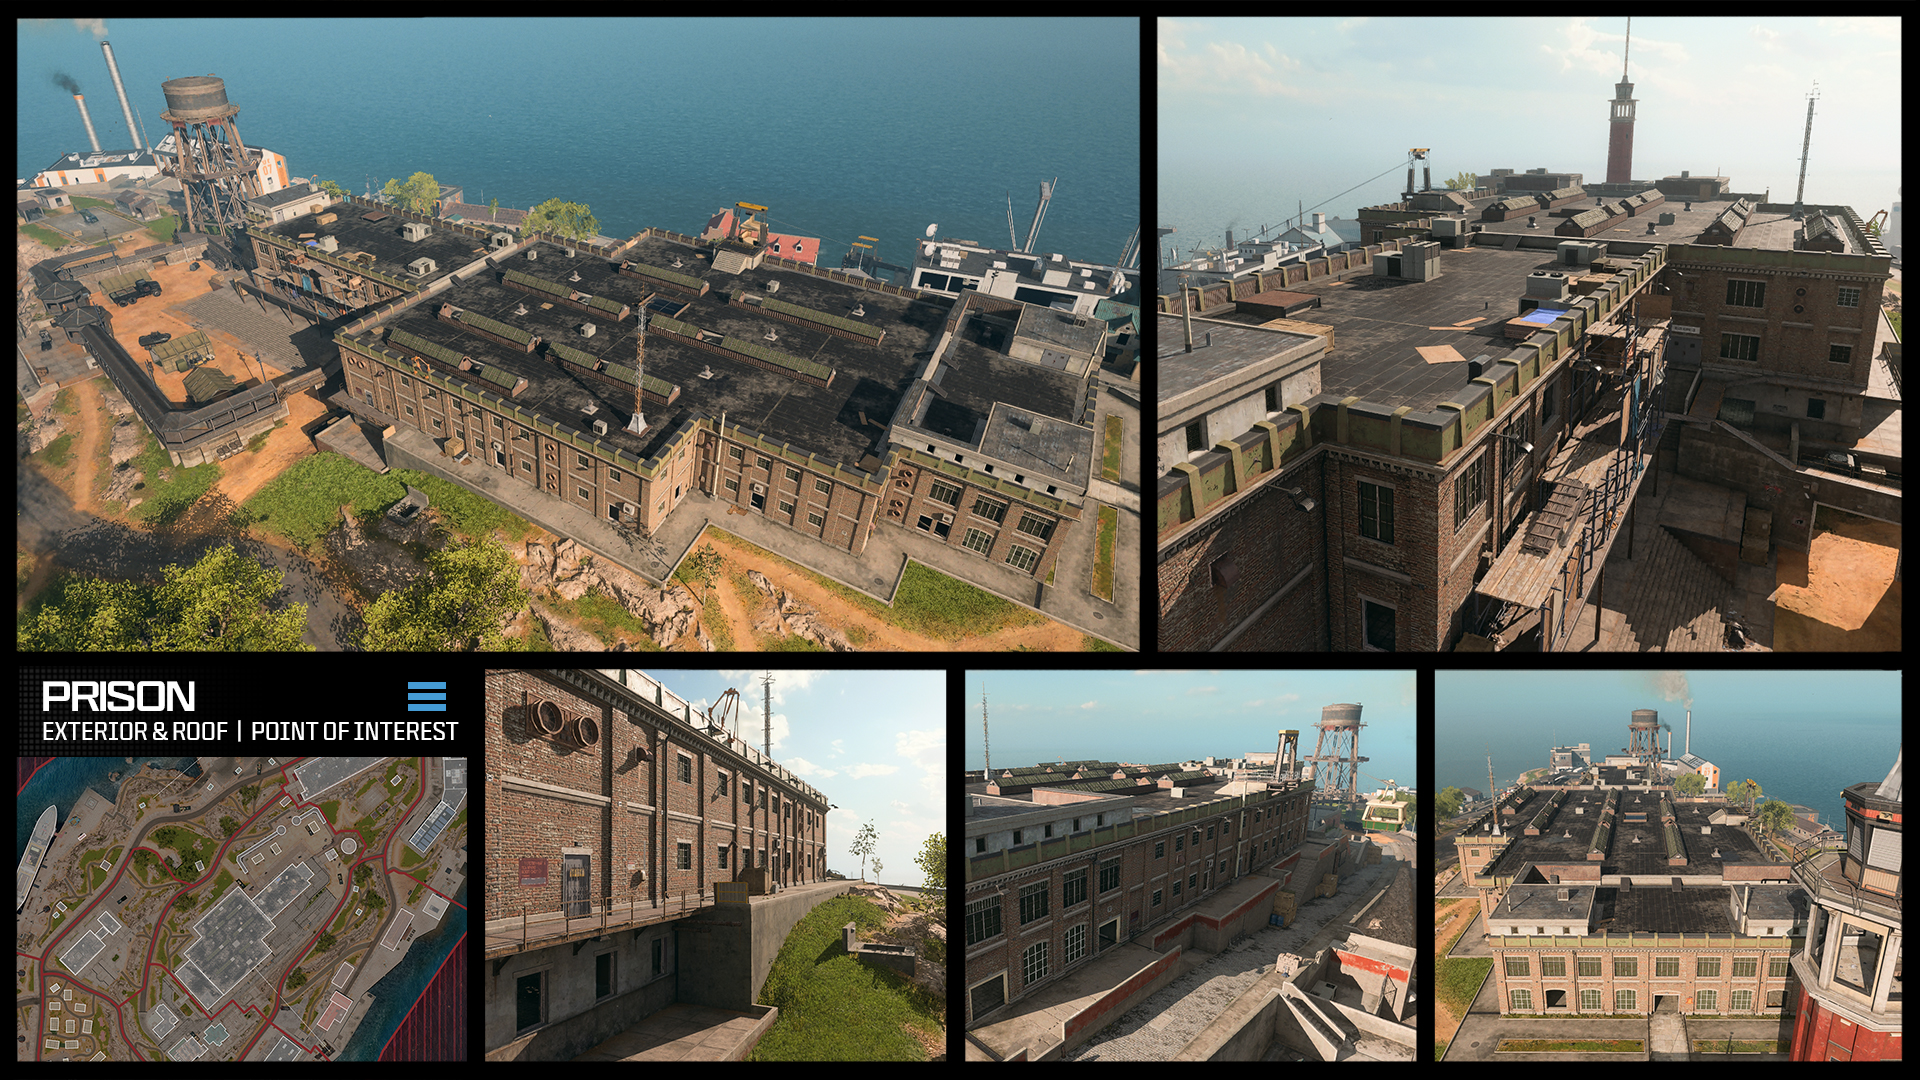
Prison Overview and Rooftop: Right in the center of the action, the sprawling Prison complex is the main draw for Operators and the largest building on the map. There are numerous points of entry: via the paved walkway, various staircases, ramps, and even the tunnel on the grassy bank above the Docks. Scattered ascenders and exterior ladders also provide direct access to the roof. This looks out across the entire island, with a 360-degree view of your surroundings, though you are vulnerable to enemy fire. The central roof has rows of pitched skylights, with several openings allowing you to drop into the Prison, as well as a tram platform that shuttles you back and forth to the Harbor.
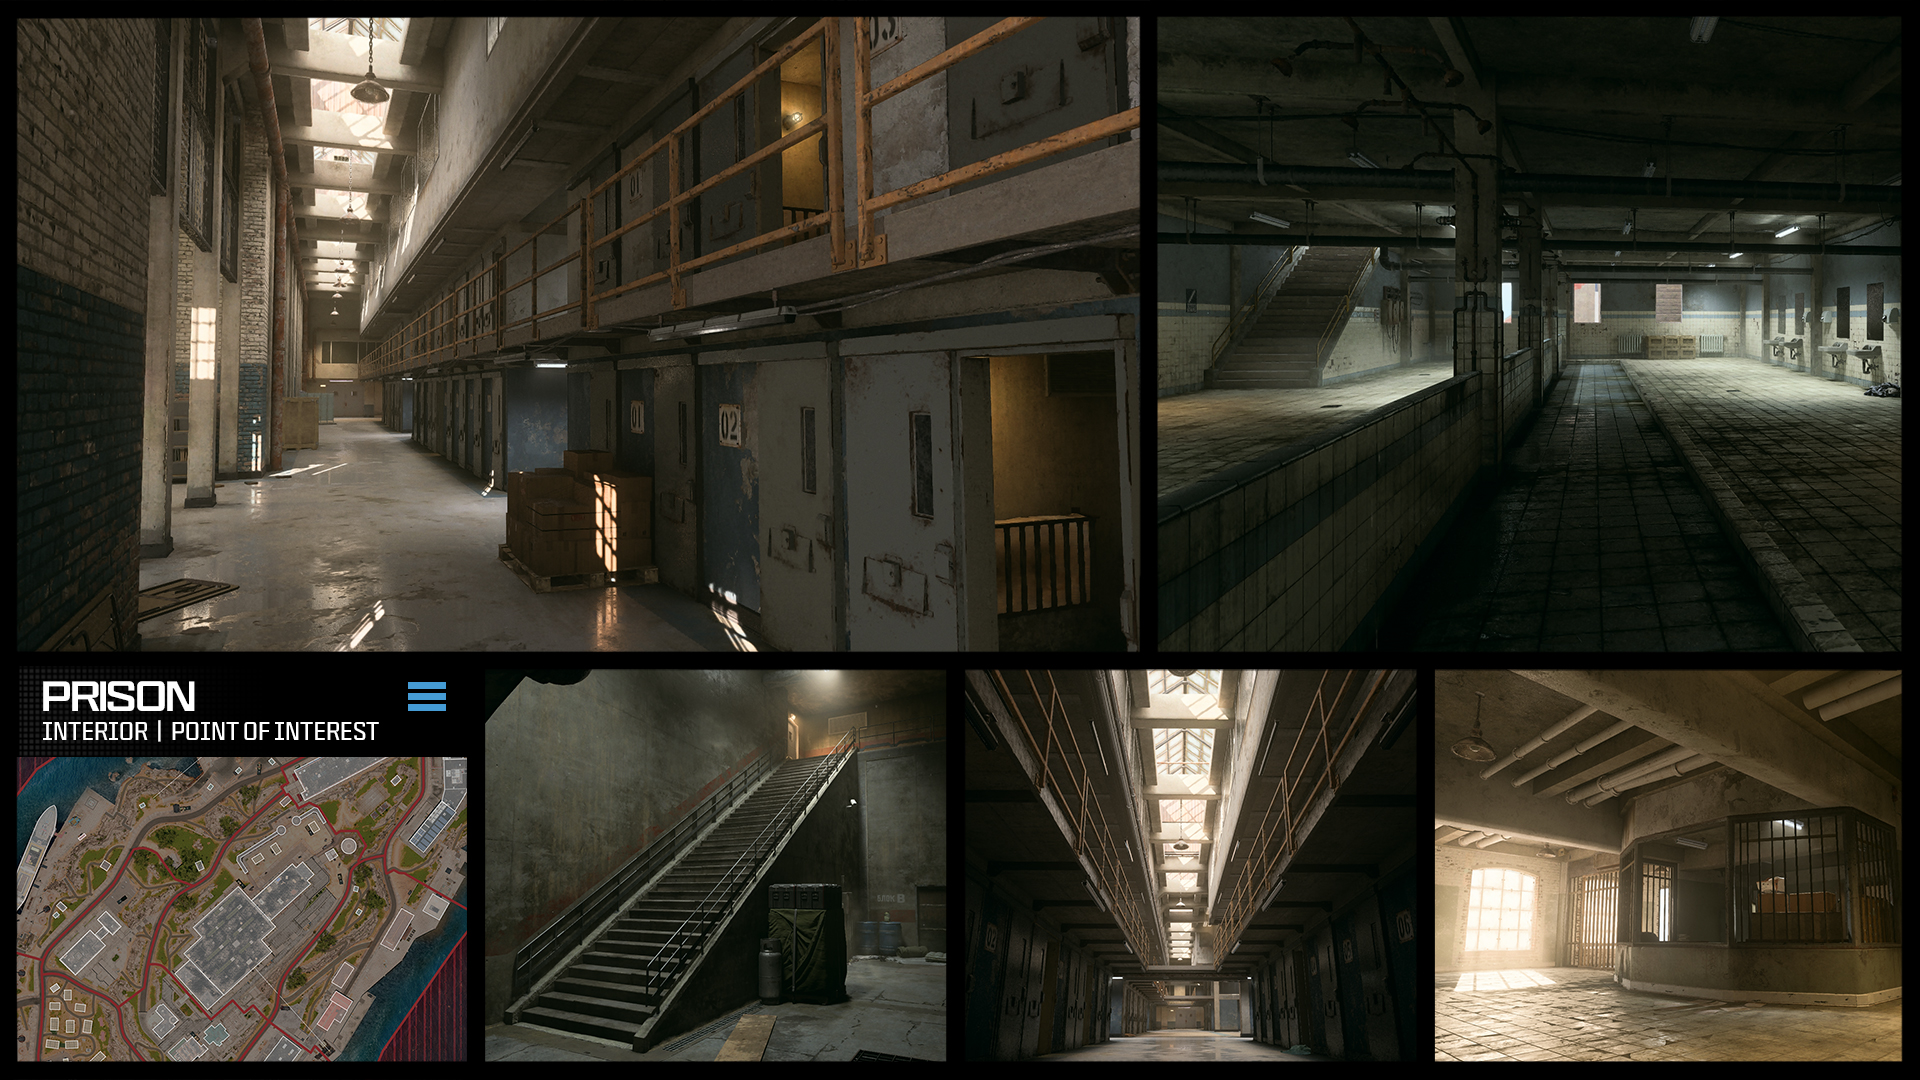
Prison Interior: The vast interior is split into the main cell block, which is clustered across four long hallways providing excellent sightlines. The wider central floor offers a little more breathing room aside from threats above you. The numerous open cells can be used as ambush points. To the northeast is the Prison cafeteria and infirmary above, which are wider rooms with pillars to dive behind. By Headquarters is the warden’s entrance with the caged lobby, more suitable for close combat. The Prison basement features showers and a small electrical room; this entire structure is just as mazelike as you remember!
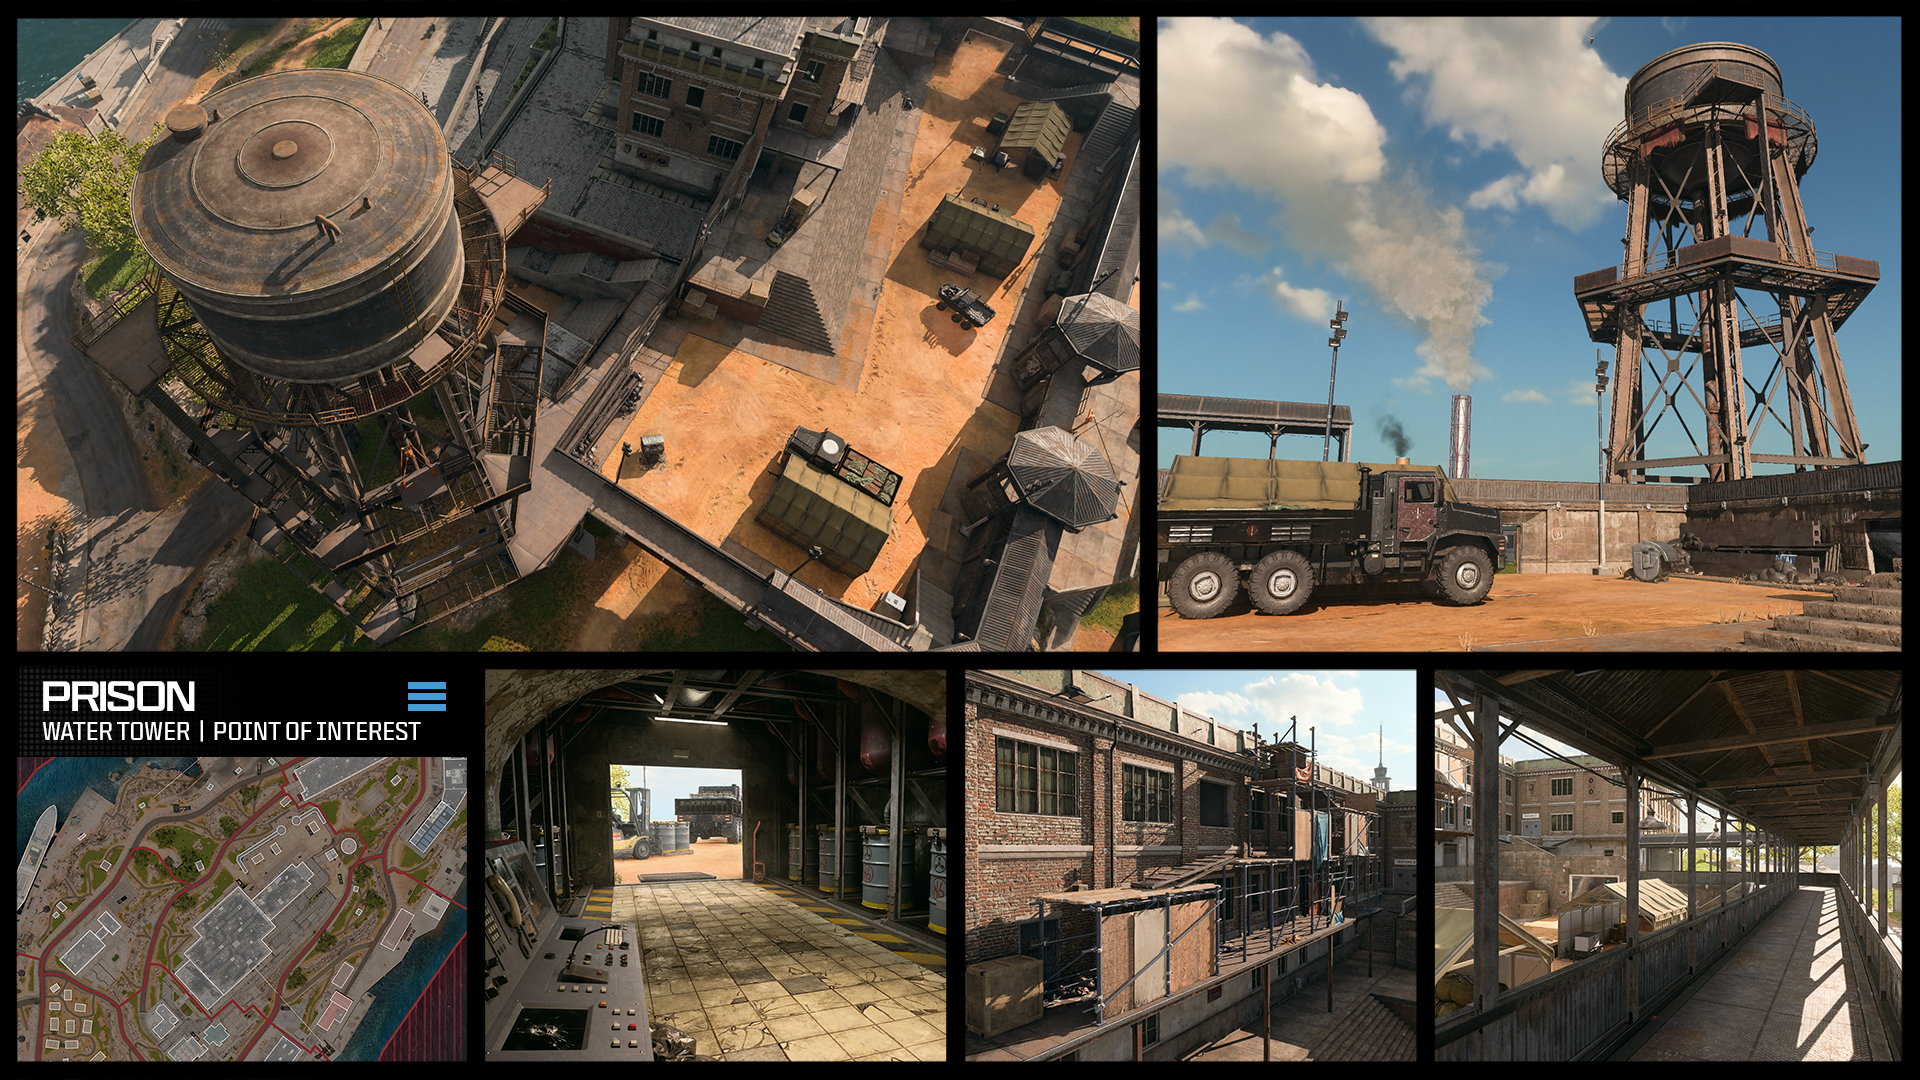
Prison Yard and Water Tower: The imposing (and rusting) Water Tower next to the Prison yard serves as the island’s main landmark and is a phenomenal watchpoint. Climb the ladder or use an ascender to reach the top. The dirt yard below has tents, vehicles, and supplies, with a wall and sentry towers. This can be a preferred location to land some eliminations before ducking into cover or using the zipline to whisk you to Industry.
Harbor

Warehouse and Old Office: The southern part of Harbor stretches between Chemical Engineering and Factory, and the concrete shoreline provides quick traversal, with several smaller buildings offering the chance to lose pursuers and find cover. The lower tram platform sits adjacent to Factory and offers a ride up to the Prison rooftop. Next to that is a red-roofed building with a covered, tunnel-like service road under its dilapidated frame, connected to gray-and-white storage structures that Konni Group seem to have forgotten about.
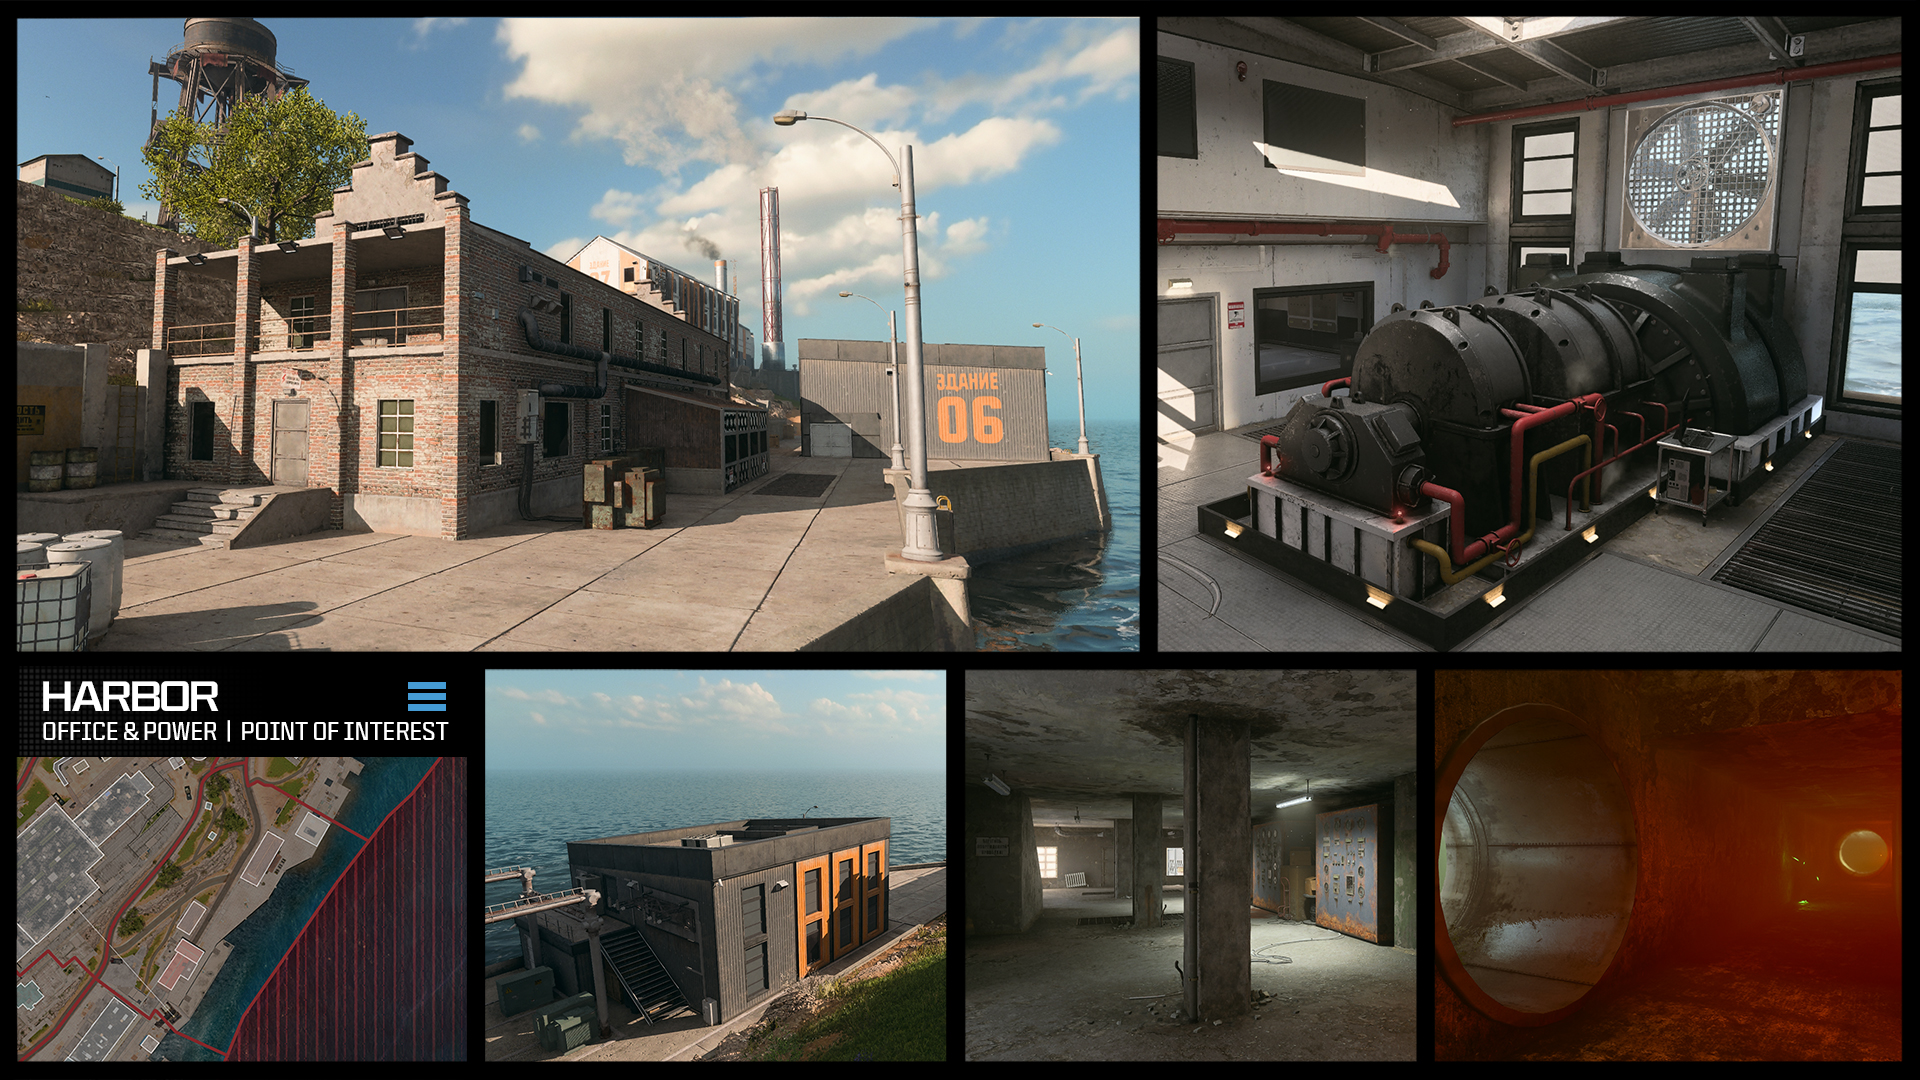
Comms Office and Power Station (Turbine): Toward Chemical Engineering is a brick warehouse and a newly constructed power station marked “06.” While the warehouse is mainly a defensive location, the power station (with black and orange exterior cladding) has smaller monitoring offices around a main turbine room, which descends into a water-filled concrete pipe you can swim through to reach multiple exit points, perfect for repositioning and flanking unsuspecting enemies.
Headquarters (and Lighthouse)
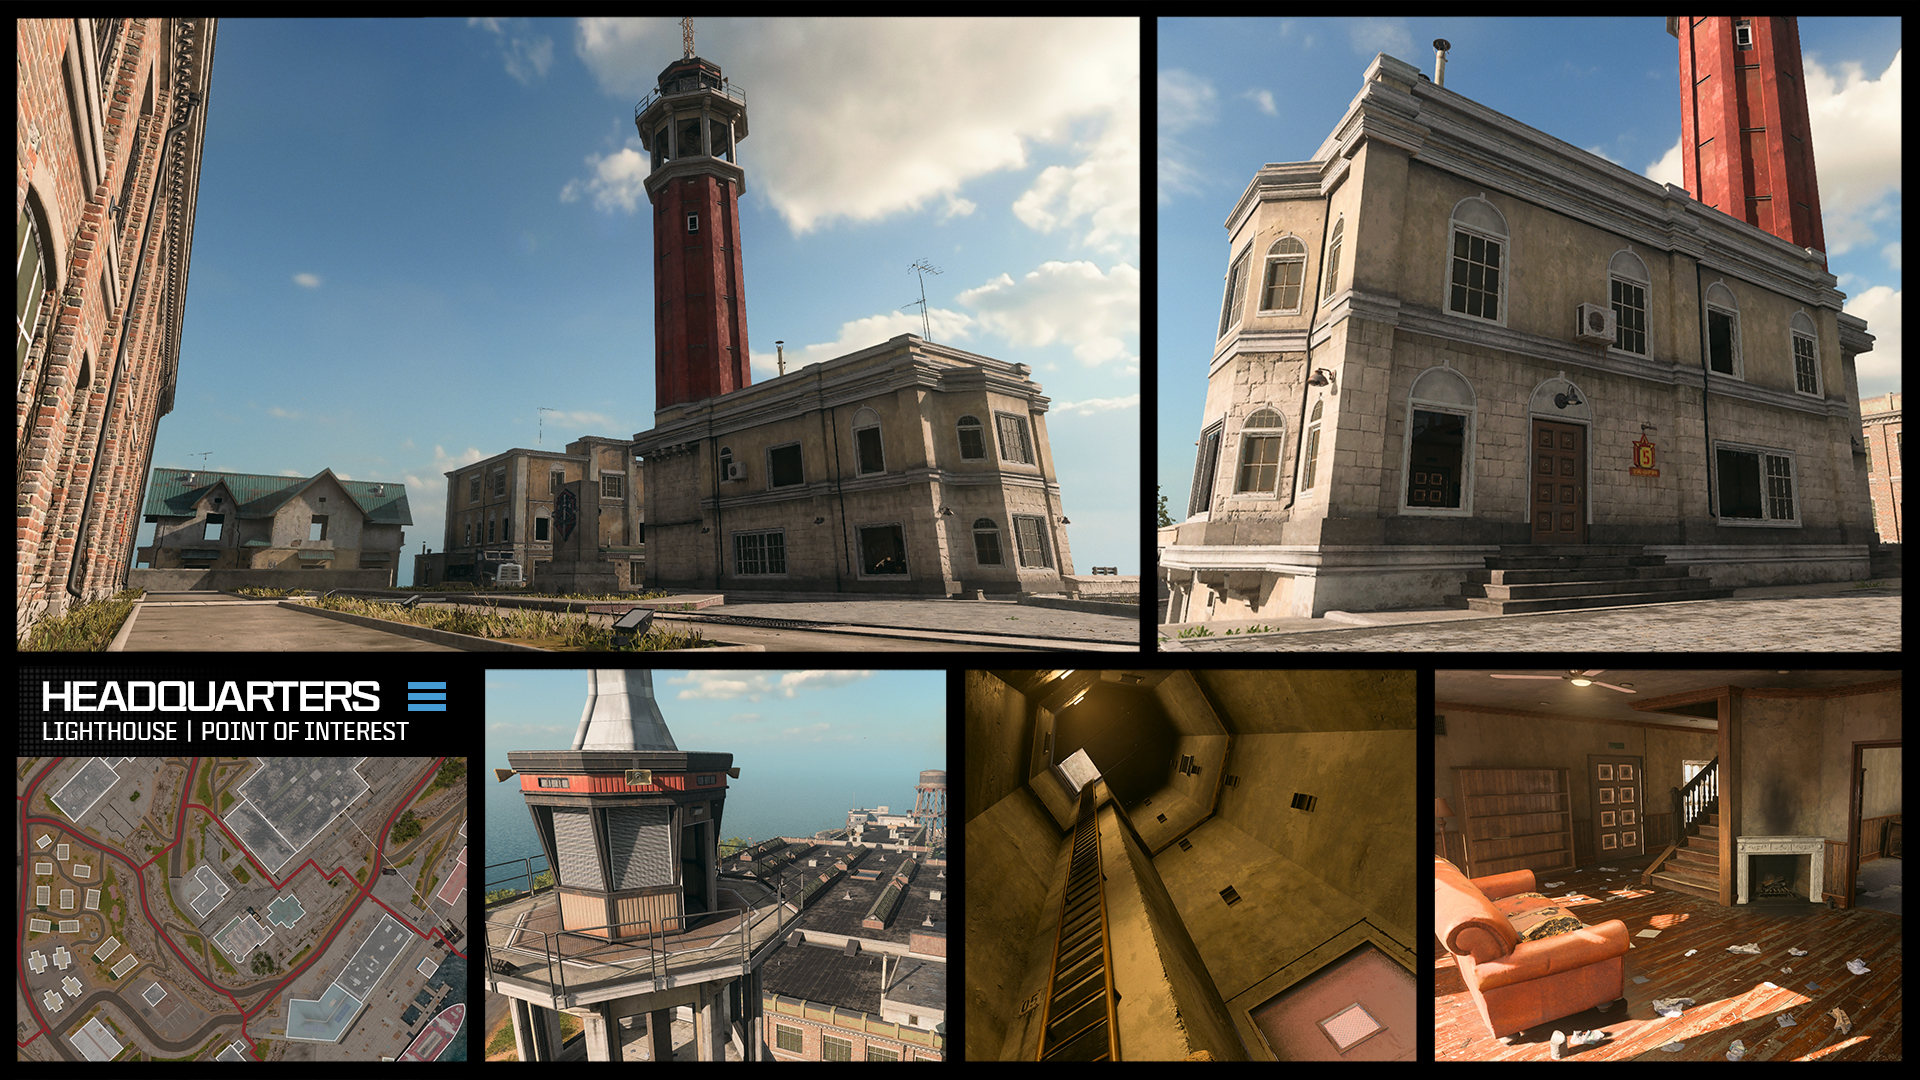
Lighthouse (Surveillance Tower): Dominating the upper forecourt of Rebirth Island between the Prison and the three main Headquarter buildings is the Lighthouse. This is used as a surveillance tower and a sniping point, as it offers one of the two highest vantage points across from the opposing Water Tower. Expect high traffic and close combat as Operators head for this structure, using parachutes or the interior ladder from the main HQ building. The HQ houses a kitchen, sitting room, study, library, and a tight cluster of offices on the upper floor.
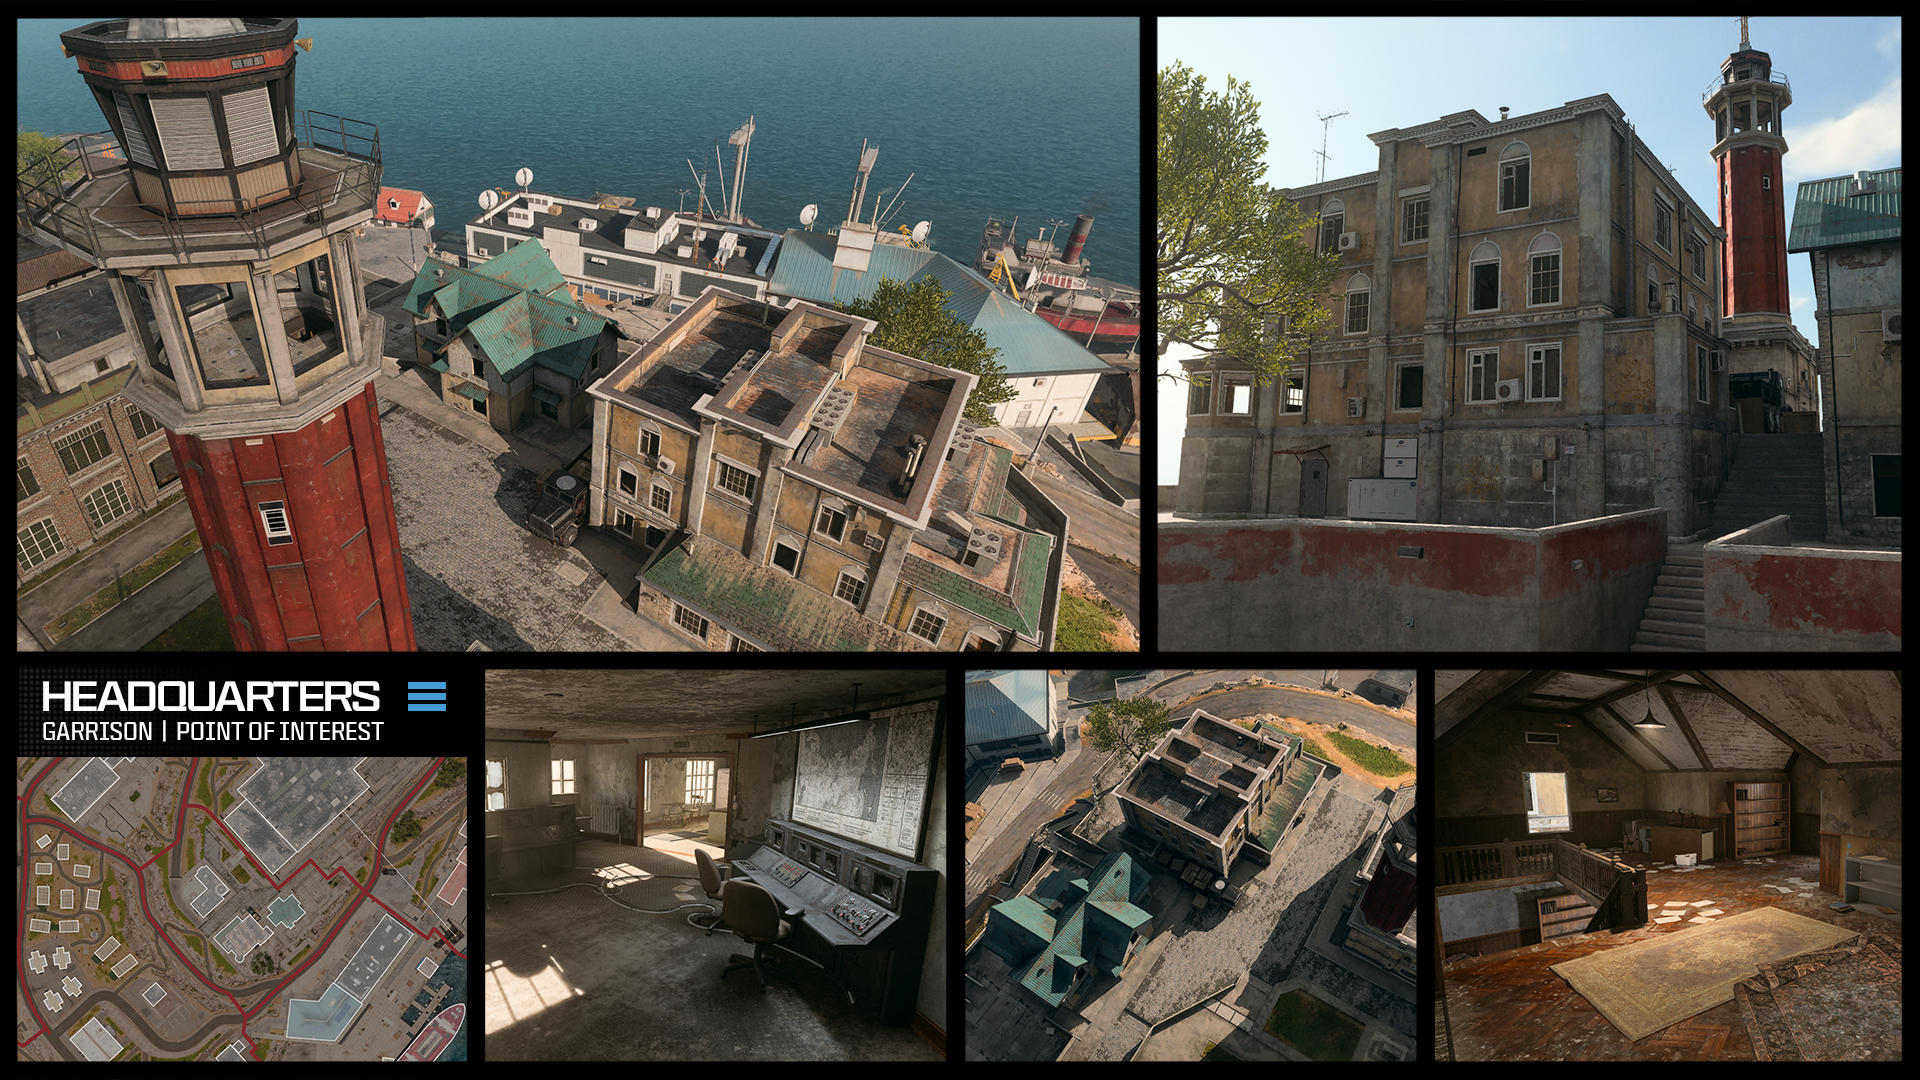
Command Center and Garrison: Not to be confused with the “Control Center” POI, the brown and stone structure with the truck parked outside offers excellent views surrounding this upper plateau. The explorable interior allows for cover and access to the roof. Next to that is the green-roofed Garrison, once offering a comfortable interior living space but now is a place for vicious combat. It also houses some interesting chambers below its main structure. . . .
Outside is a twisting network of exterior concrete staircases that lead down to the main road, Factory, and sloping Prison road.
Factory
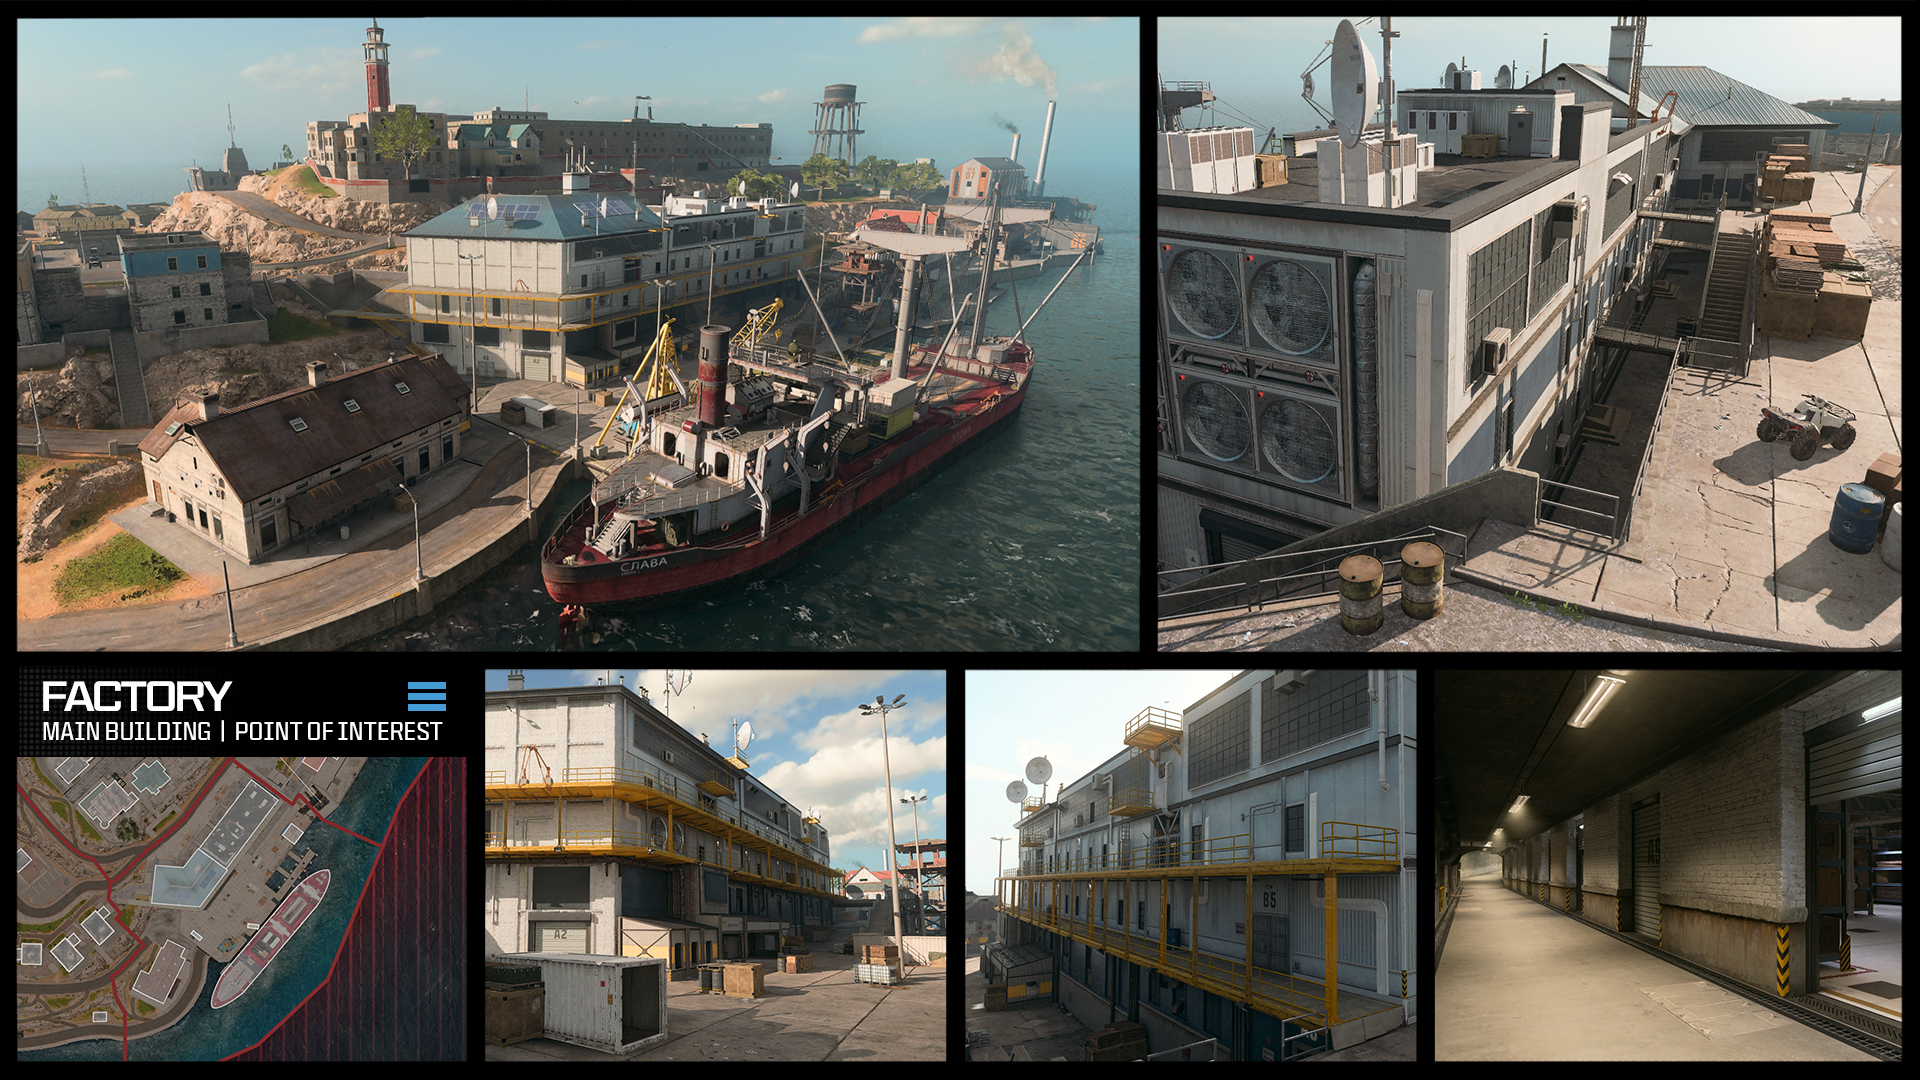
Factory and Office: Clad in muddy white corrugated metal, the Factory is the largest feature on the southwestern shoreline. This commanding, three-floor building and basement comes with an exterior gantry overlooking the dockside and Harbor, and ascenders offer rapid access to the rooftop. Inside are control rooms, with a lower floor midsized storage room half-filled with barrels and boxes. This is where you’ll find a long concrete tunnel hallway with covered access to and from the Factory. Toward Stronghold is a single-level brick office with a pitched roof and views across the docks.
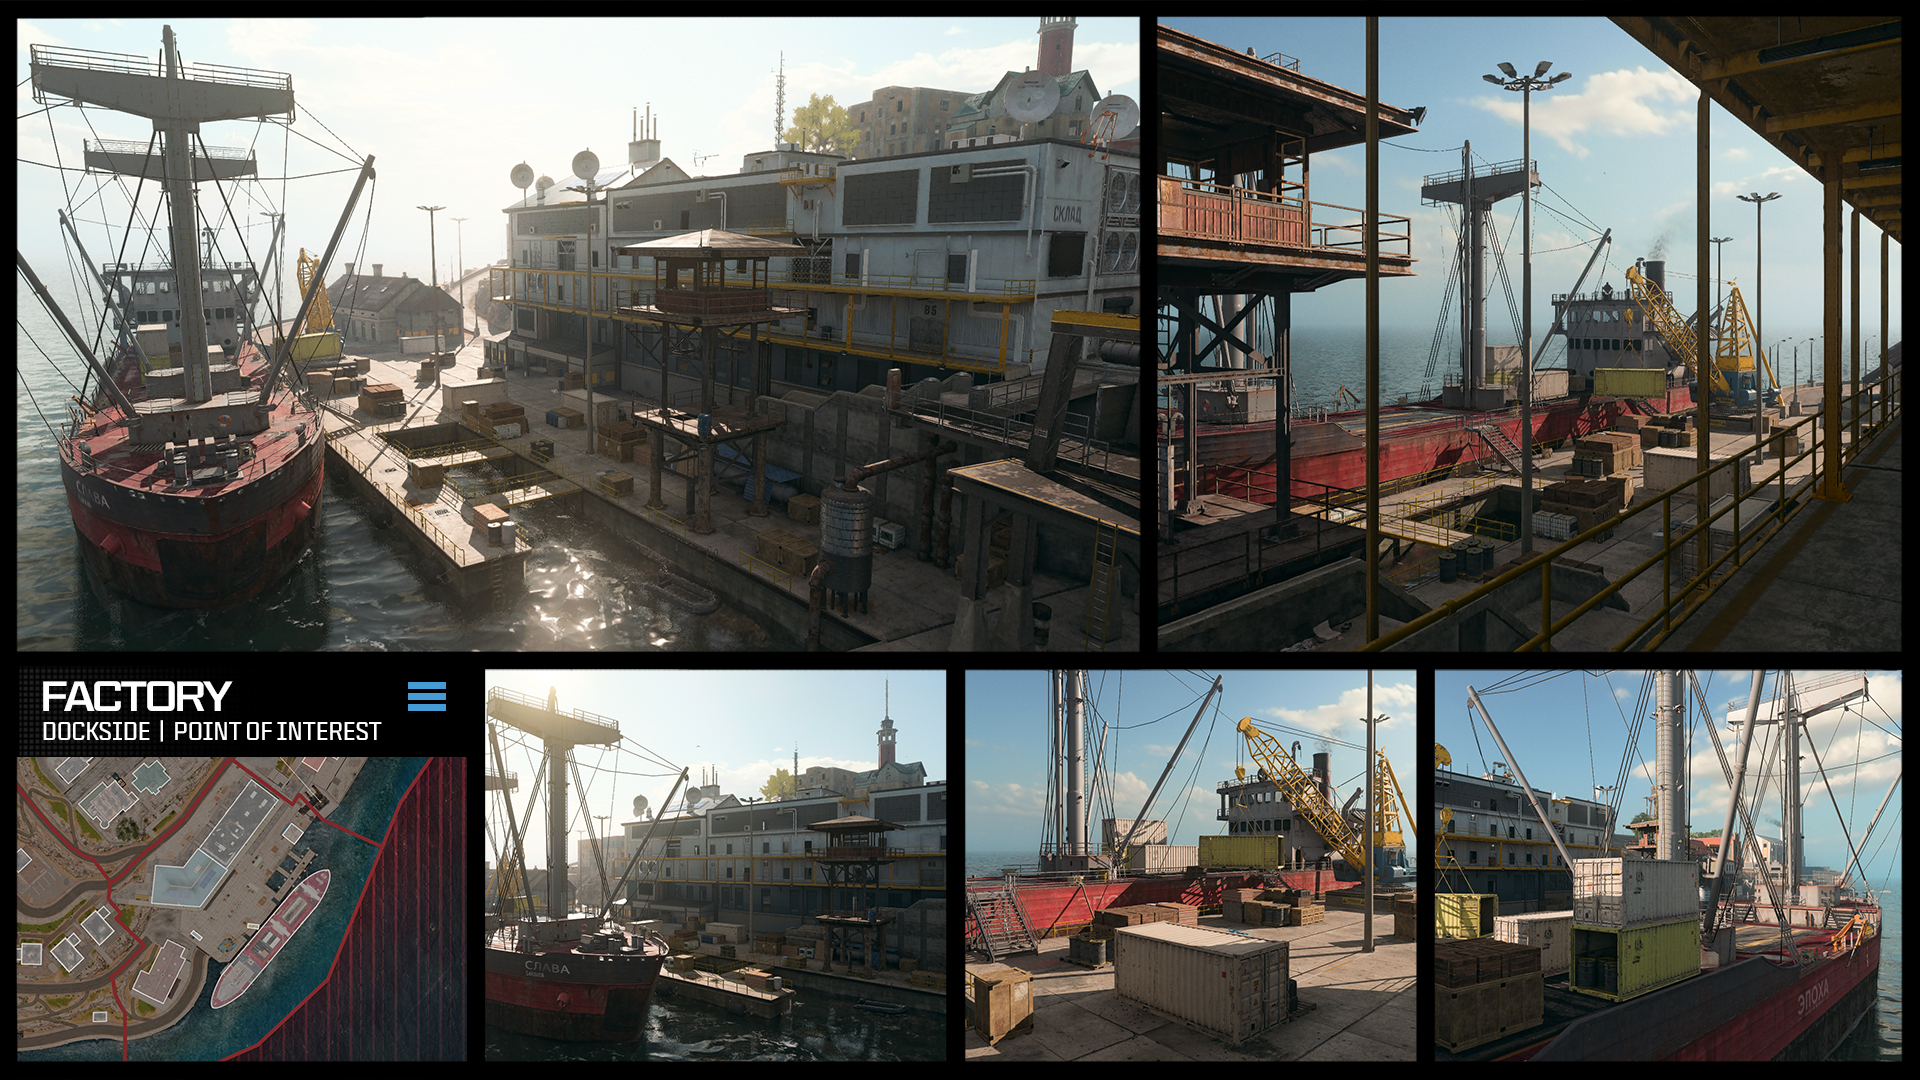
Dockside and Freighter: One of the lowest-lying areas on the map, the docks provide a straight and flat route around the Factory, with a crane, tower, tram station platform, and docked freighter to utilize for climbing or cover. The red hull of the freighter is visible to spot at distance, and the ship has a larger top deck compared to the yellow freighter moored at Dock.
Living Quarters
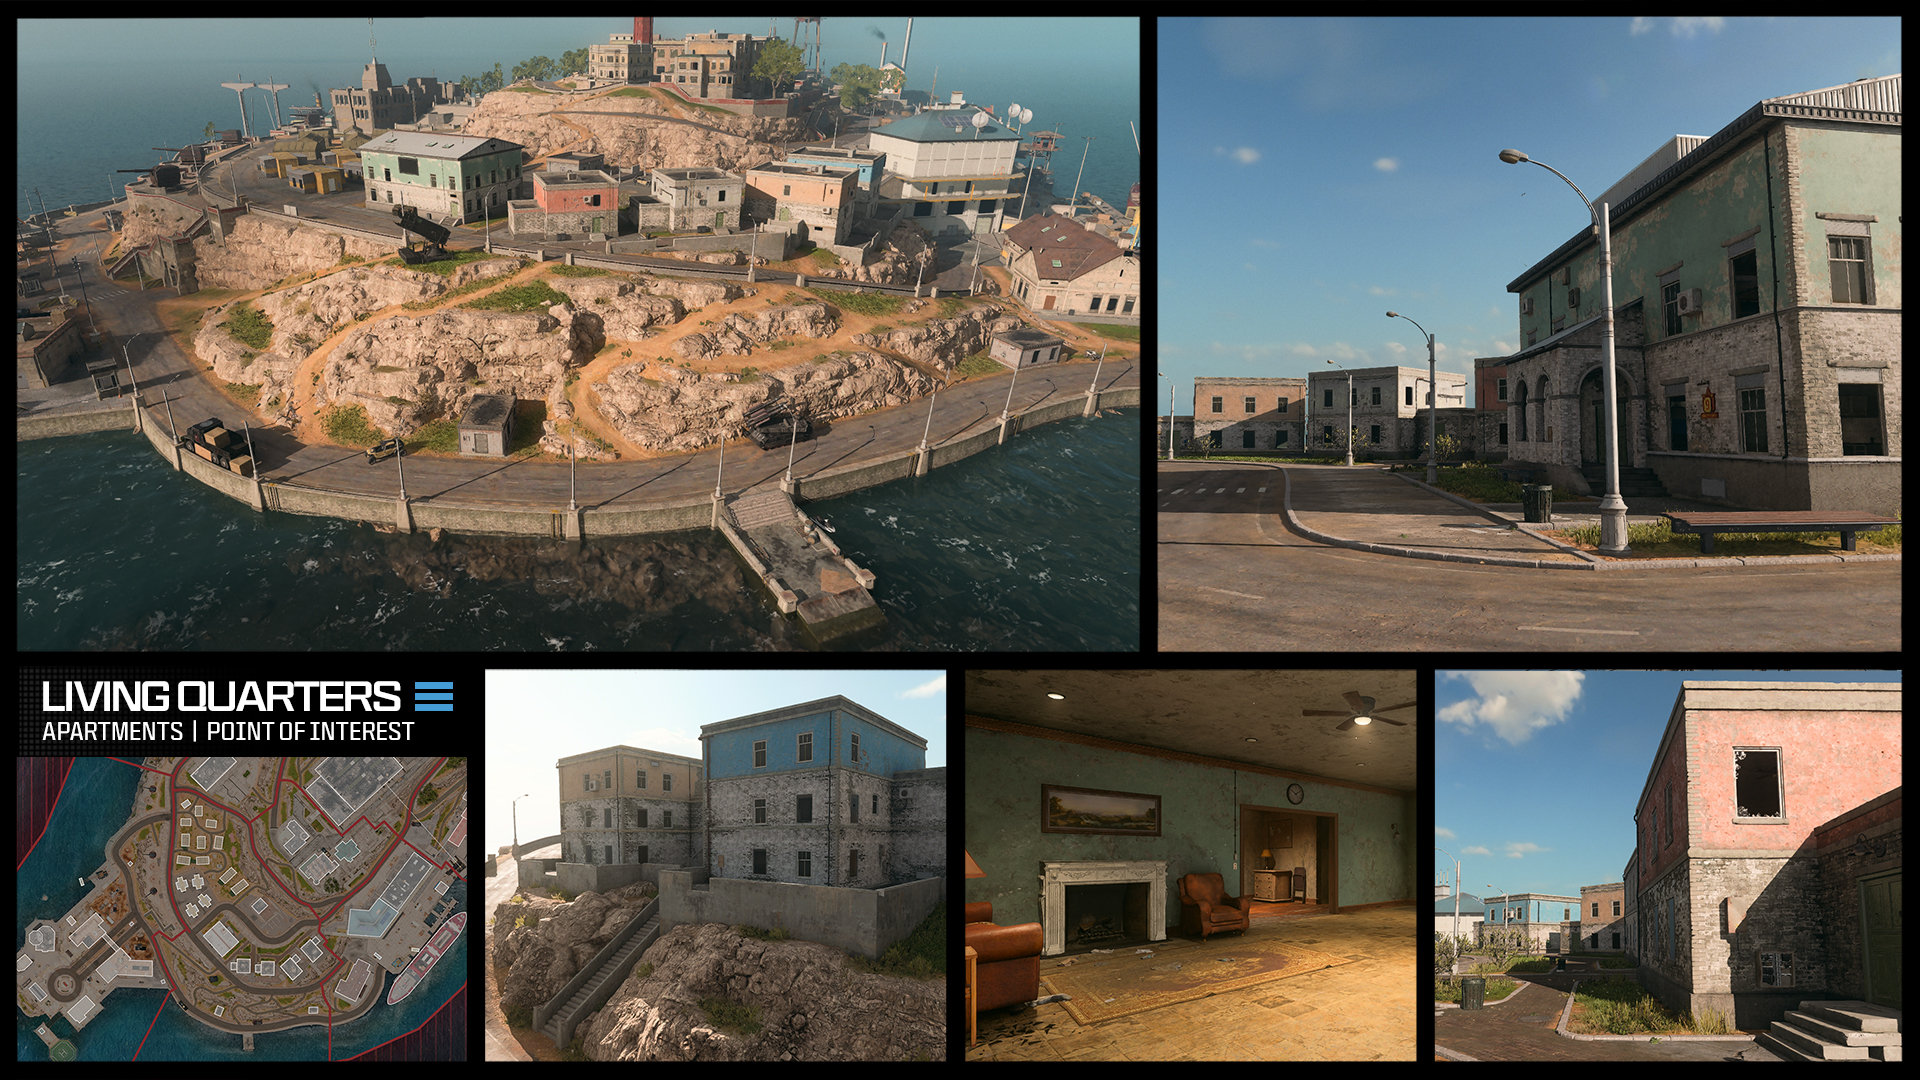
Living Quarters — Apartments and Building No. 9: A set of four apartments in an assortment of faded pastel colors allows easy recognition… Especially if you’re dropping in from above. The teal and orange and the gray and red buildings are pairs, with almost identical interiors, and offer tight but reasonable hiding places. The green and white main living quarters (No. 9) stands alone in the center of this POI… With double doors and broken windows, good interior access, and a ladder to the roof, which provides good views of your surroundings.
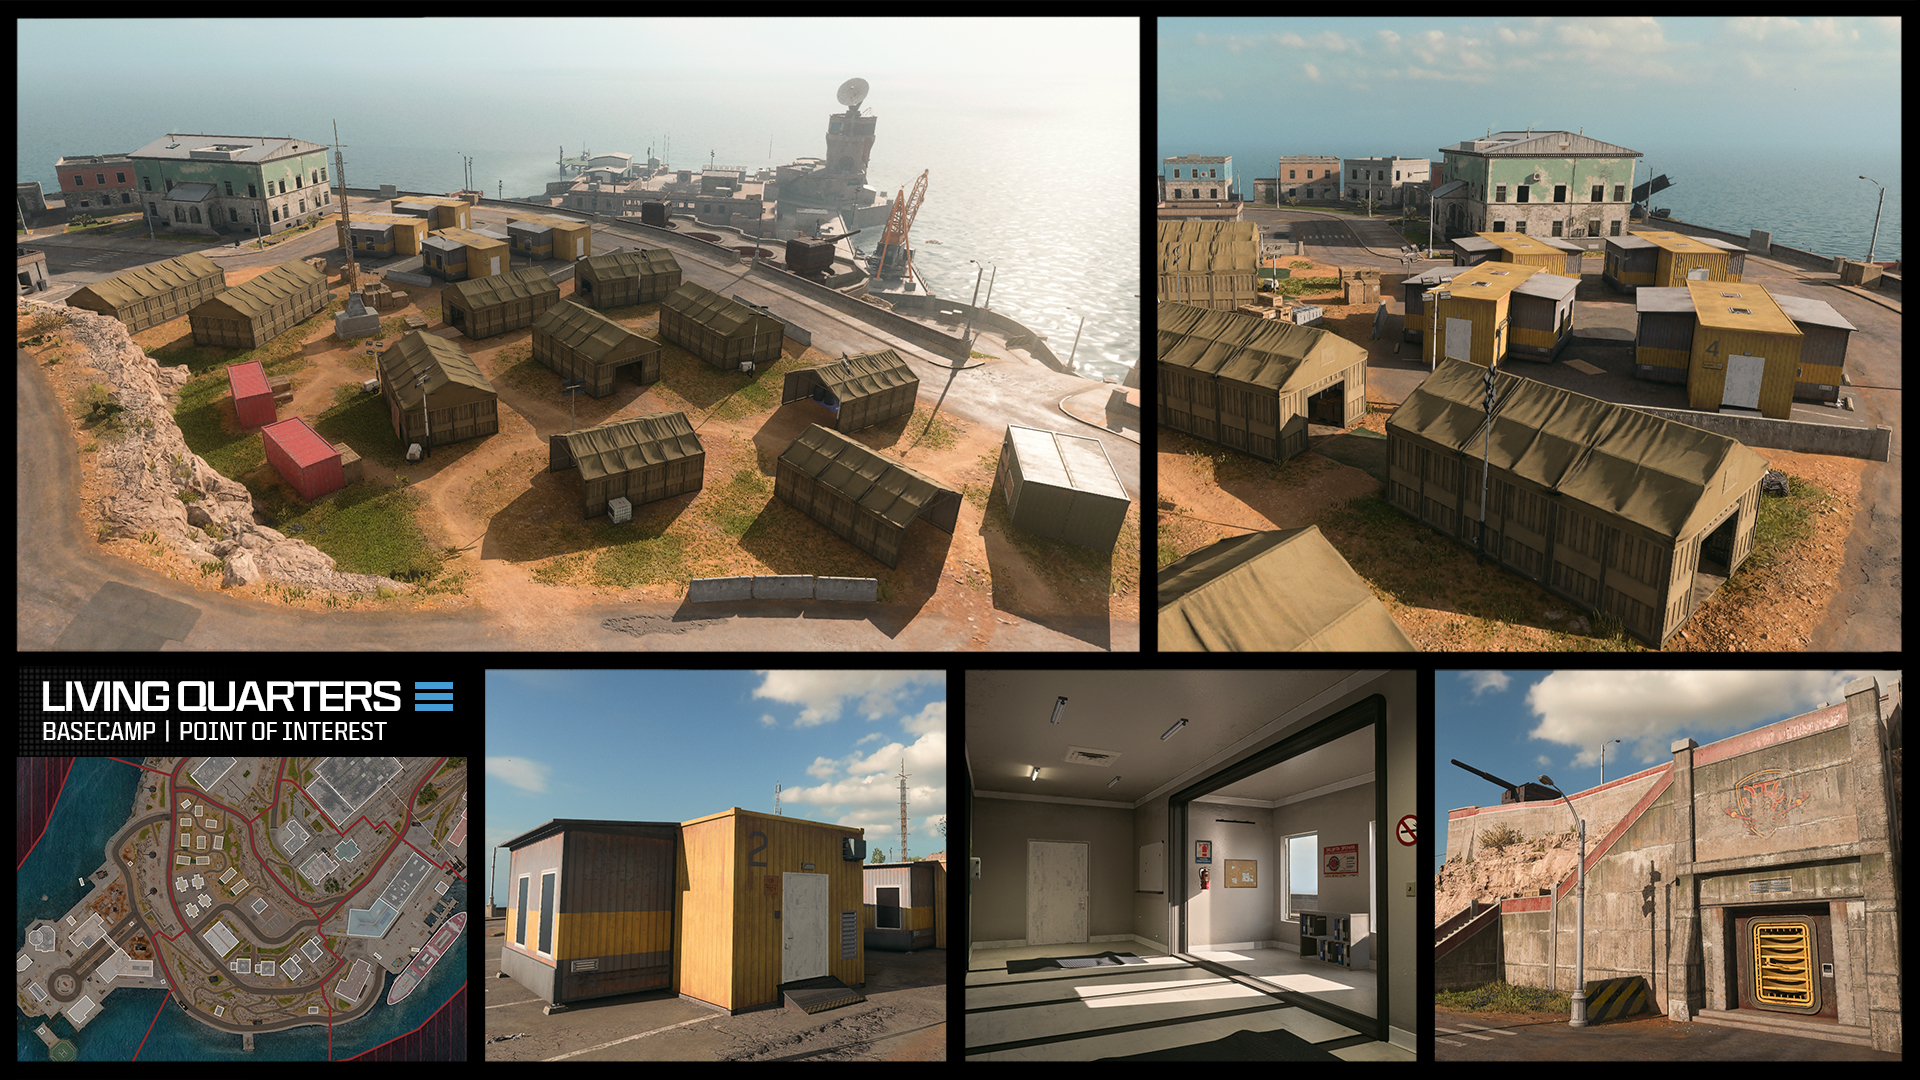
Living Quarters — Basecamp and Switchbacks: On the low plateau overlooking Stronghold is a sprawling network of military tents, medical prefabs, and a small office building. Up the craggy rocks is Headquarters. Although the structures may have changed over the years, their position has not. This is a great place to get off the road and get out of sight. Also note the storage room near the pathway switchbacks and jetty accessible by the coastal road, as well as a strange and locked bunker door. How does that open?
Stronghold
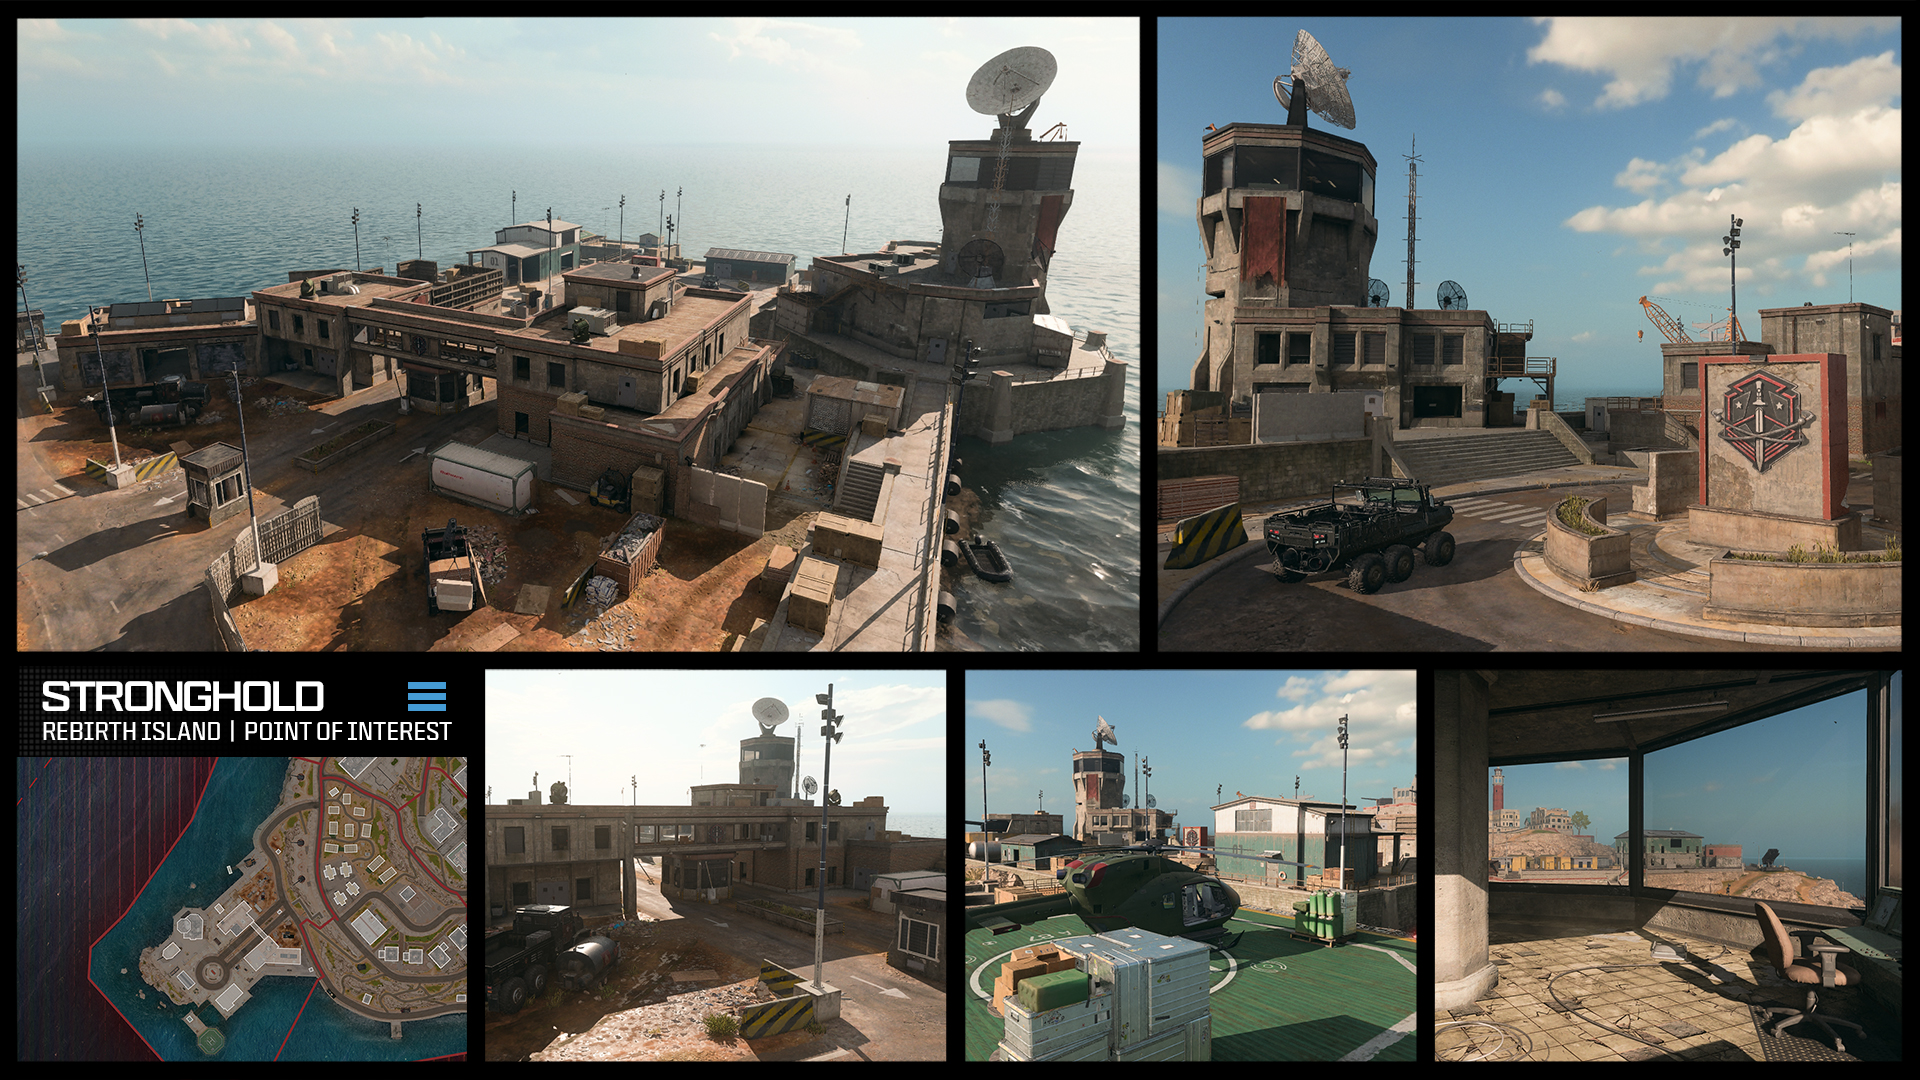
Another favorite location for Operators to drop into, the southwestern corner of Rebirth Island consists of a complex… Low-lying construction site, an old checkpoint in need of repair, a rear roundabout, a helipad, and the landmark satellite tower. There’s plenty of caches, vehicles, and barricades to utilize, as well as confined offices and a covered walkway across the checkpoint. Climb the tower for an elevated and commanding view from various levels. If all else fails, remember you can jump onto the shoreline rocks or even swim to reposition to a more advantageous location.
Cosa ne pensate di questa spettacolare anteprima? Siete pronti per lanciarvi nell’azione di Rebirth Island? La discussione, come sempre, è assolutamente aperta!
- Articolo realizzato in collaborazione con la community di riferimento di Warzone d’Italia (Facebook)
Articoli correlati: